⚠Scope. JD3 ZoneTools handles zone file authoring and canvas layout. It is not a show-control, cue-programming, timeline, or emergency-stop tool. Output-affecting work (UGC correction, projector mutes) lives in clearly separated workspaces with explicit guards.
§ 01The work, in order
Advance preparation
Build the zone file before you start programming the show. The exact groups and looks still depend on the rig; ZoneTools removes the repeated list, geometry, calculation, and scripting work around those decisions.
- Connect to BEYOND or start a new file. Confirm the local connection under Settings → Configuration… → Connections, then import the active Zone List, import a CSV, or build sections in Layout.
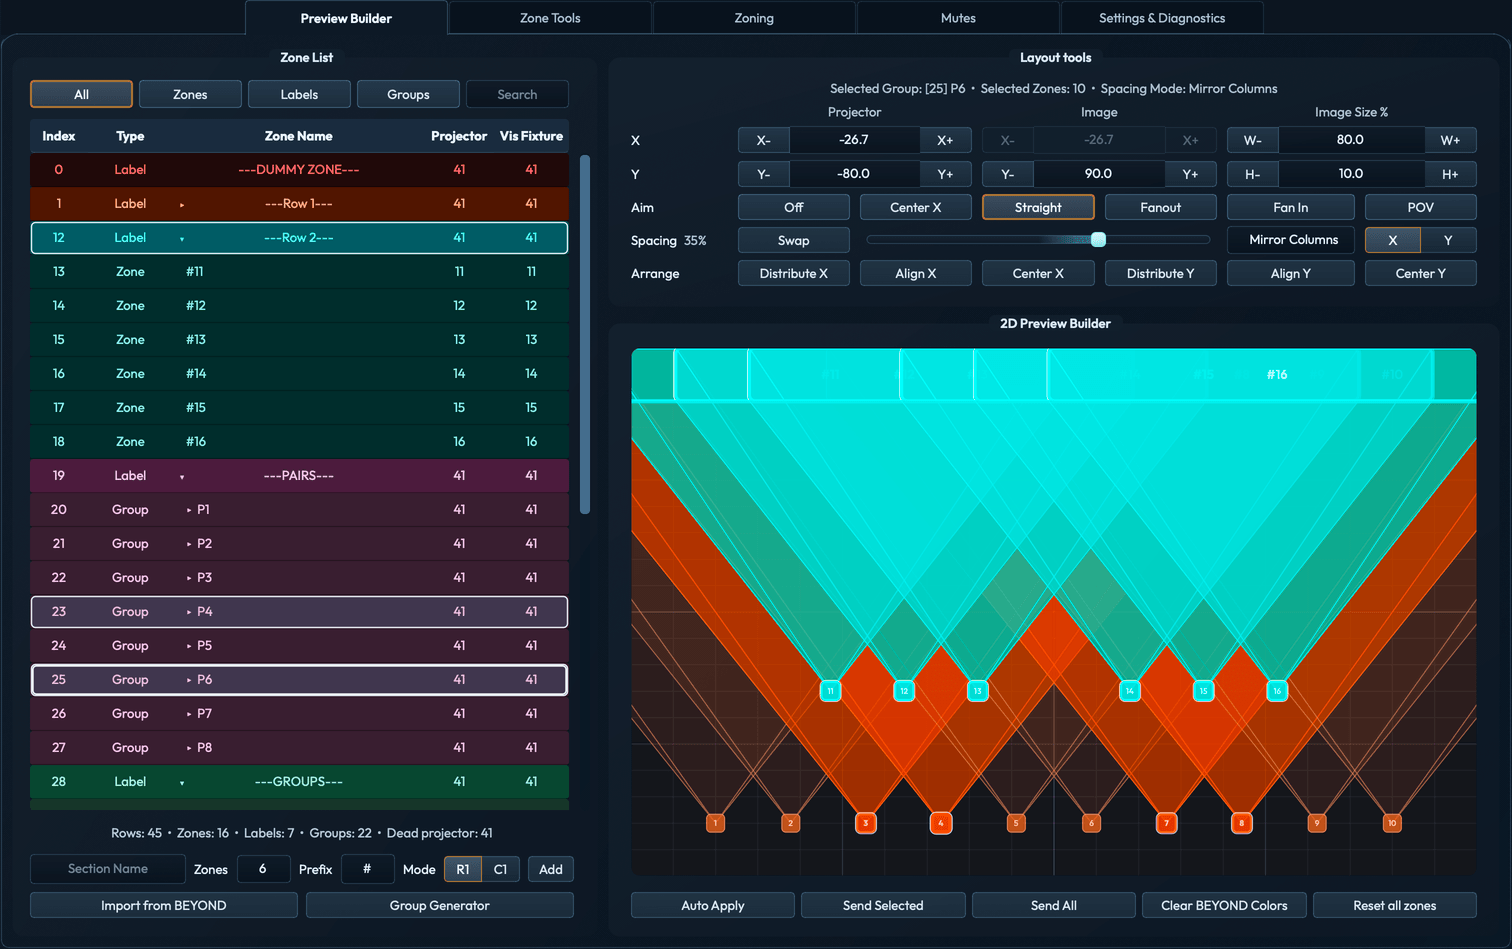
- Lay out the preview geometry. Select the zones, distribute their projector positions, aim the images, and adjust the spacing against the plot.
- Generate and review the routing groups. Use Group Generator for pairs, stage-side groups, columns, and larger geometry-based suggestions. Adjust the memberships that need a programmer's judgment.
- Build the pixel maps. Select the zones in Toolbox and use Map Slicer to get the left, right, bottom, and top values for each BEYOND Window-and-Resize slice.
- Build the invert looks. First create the six-effect
−100 Xstack in BEYOND, save it as a Quick Effect, and paste it into every zone. Then use Invert Helper to assign the six geometry-based looks. ZoneTools does not create or paste the BEYOND effect stack. - Build the mute workspace. Arrange projector buttons from the 2D layout, marquee-select the groups you need, and assign projector groups to master buttons. Review the control relationships before using the workspace live.
On-site zoning
Zone the physical rig on show day or overnight before the show. In Standalone mode, one ZoneTools computer controls its local BEYOND. For two-person zoning, Node 1 hosts the session and two Remotes can connect to it at the same time; a second BEYOND computer is not required. Node 1 keeps one operator from changing a zone while the other operator has it open.
See § 05 Zoning for correction and output controls, and § 7.2 Remote Session for pairing and connection settings.
Live operation
During the show, use the prepared area mutes when an artist enters an area that should not receive laser output. The mute workspace is operational control, not an E-stop; your hardware safety system and show procedures remain the final layer.
The rest of this manual follows the four application tabs, then collects menus, keybindings, settings, safety notes, and troubleshooting as reference.
§ 02The main window
The main window has four tabs across the top:

| Tab | Purpose |
|---|---|
| Layout | Zone list, canvas, layout/spacing tools, Group Generator, and the apply controls. |
| Toolbox | Zone-list authoring helpers and CSV-focused workflows. Shares the underlying profile model with Layout. |
| Zoning | UGC correction with a correction-grid preview, test-frame controls, and laser-output controls. |
| Mutes | Live projector mute/unmute (takes effect immediately), plus a separate Edit mode for setting up pair/master groups and projector placement. |
Those four tabs are the only workspaces. Everything else (connections, diagnostics, preferences, remote session, reset actions) lives in the Configuration… dialog, opened from Settings → Configuration… and not from a tab. It is covered in § 07.
The menu bar adds File, Edit, Settings, Tools, and Help menus. Full enumeration is in Reference: menus.
§ 03Layout
Layout is where you build zone list profiles and position zones on the canvas.
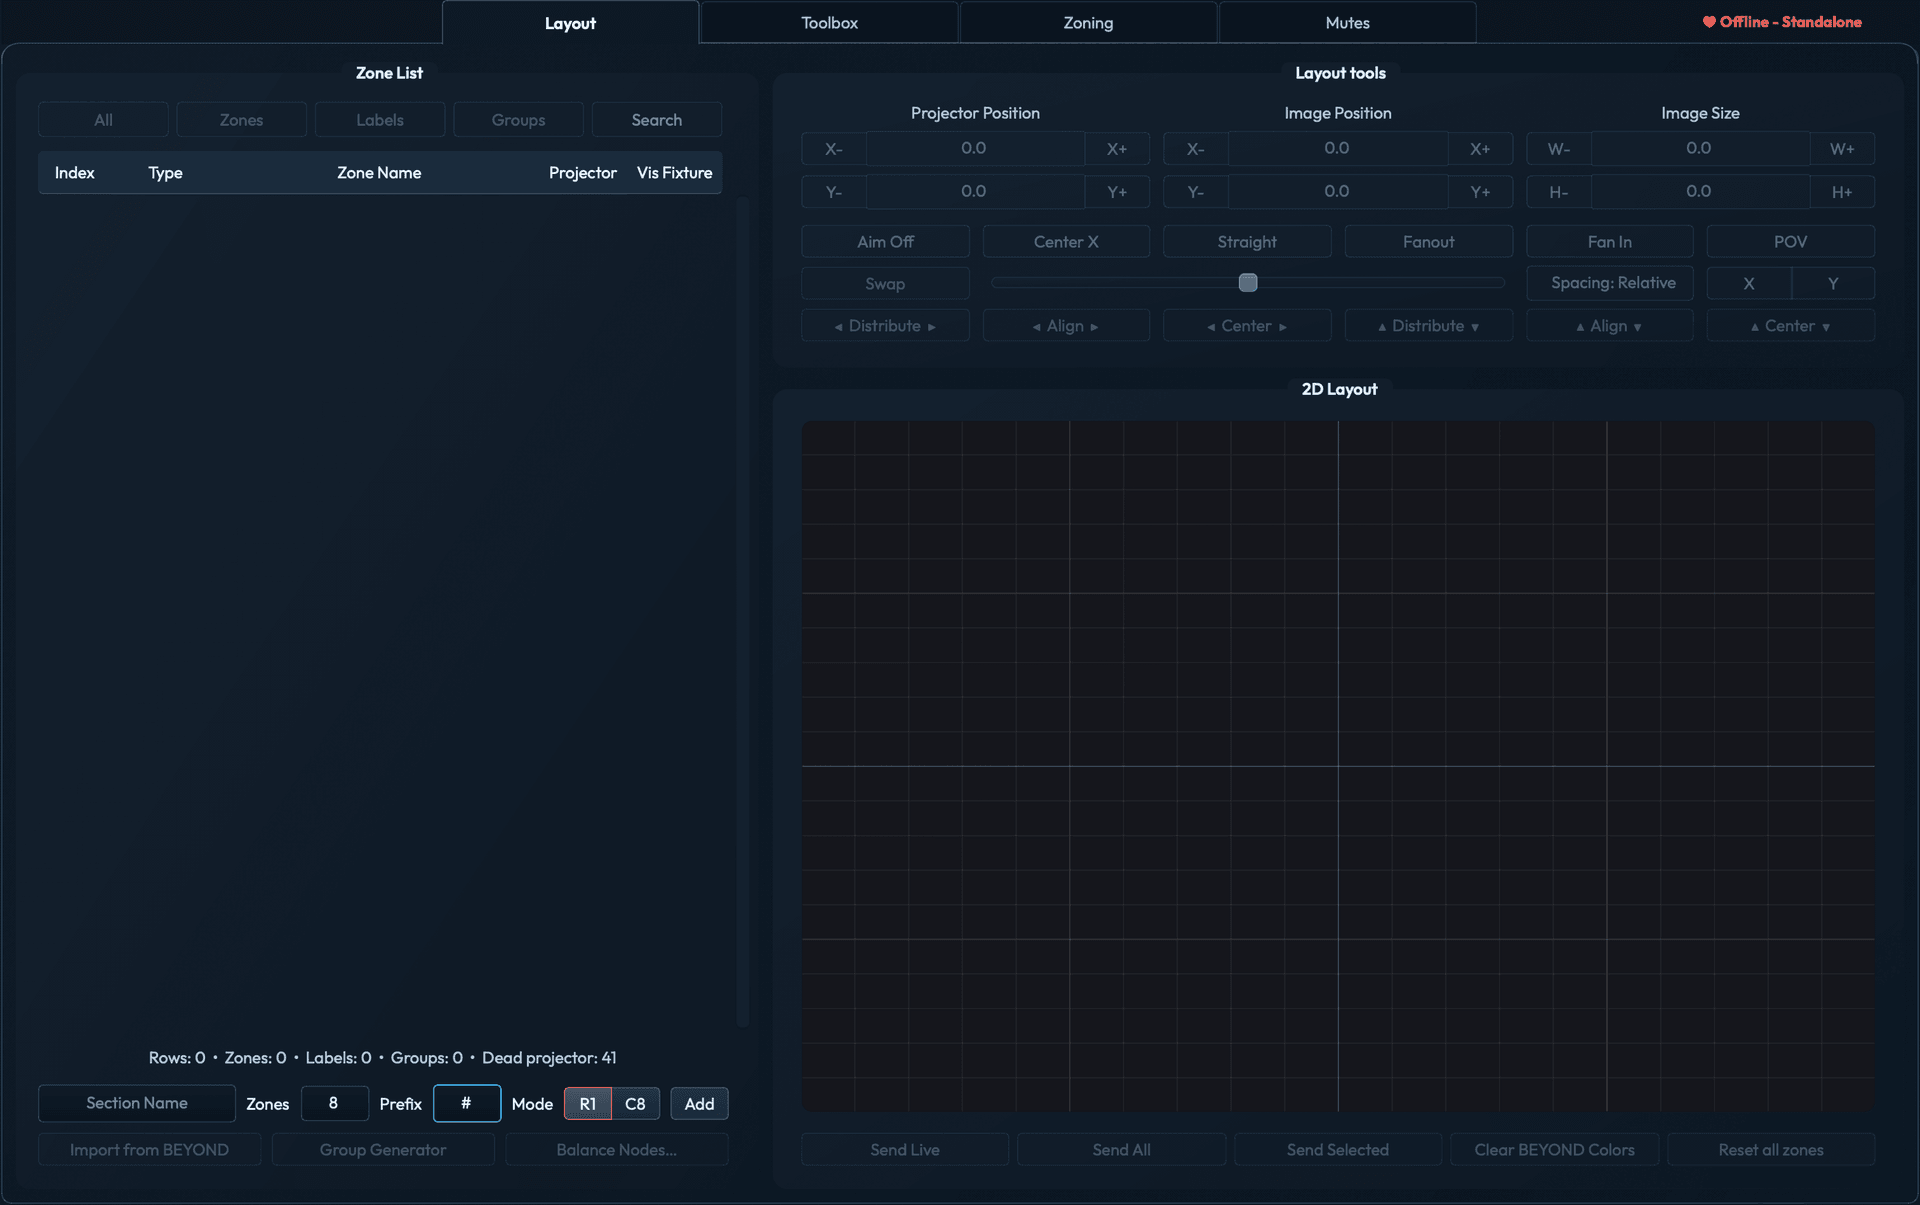
3.1 Zone list and canvas
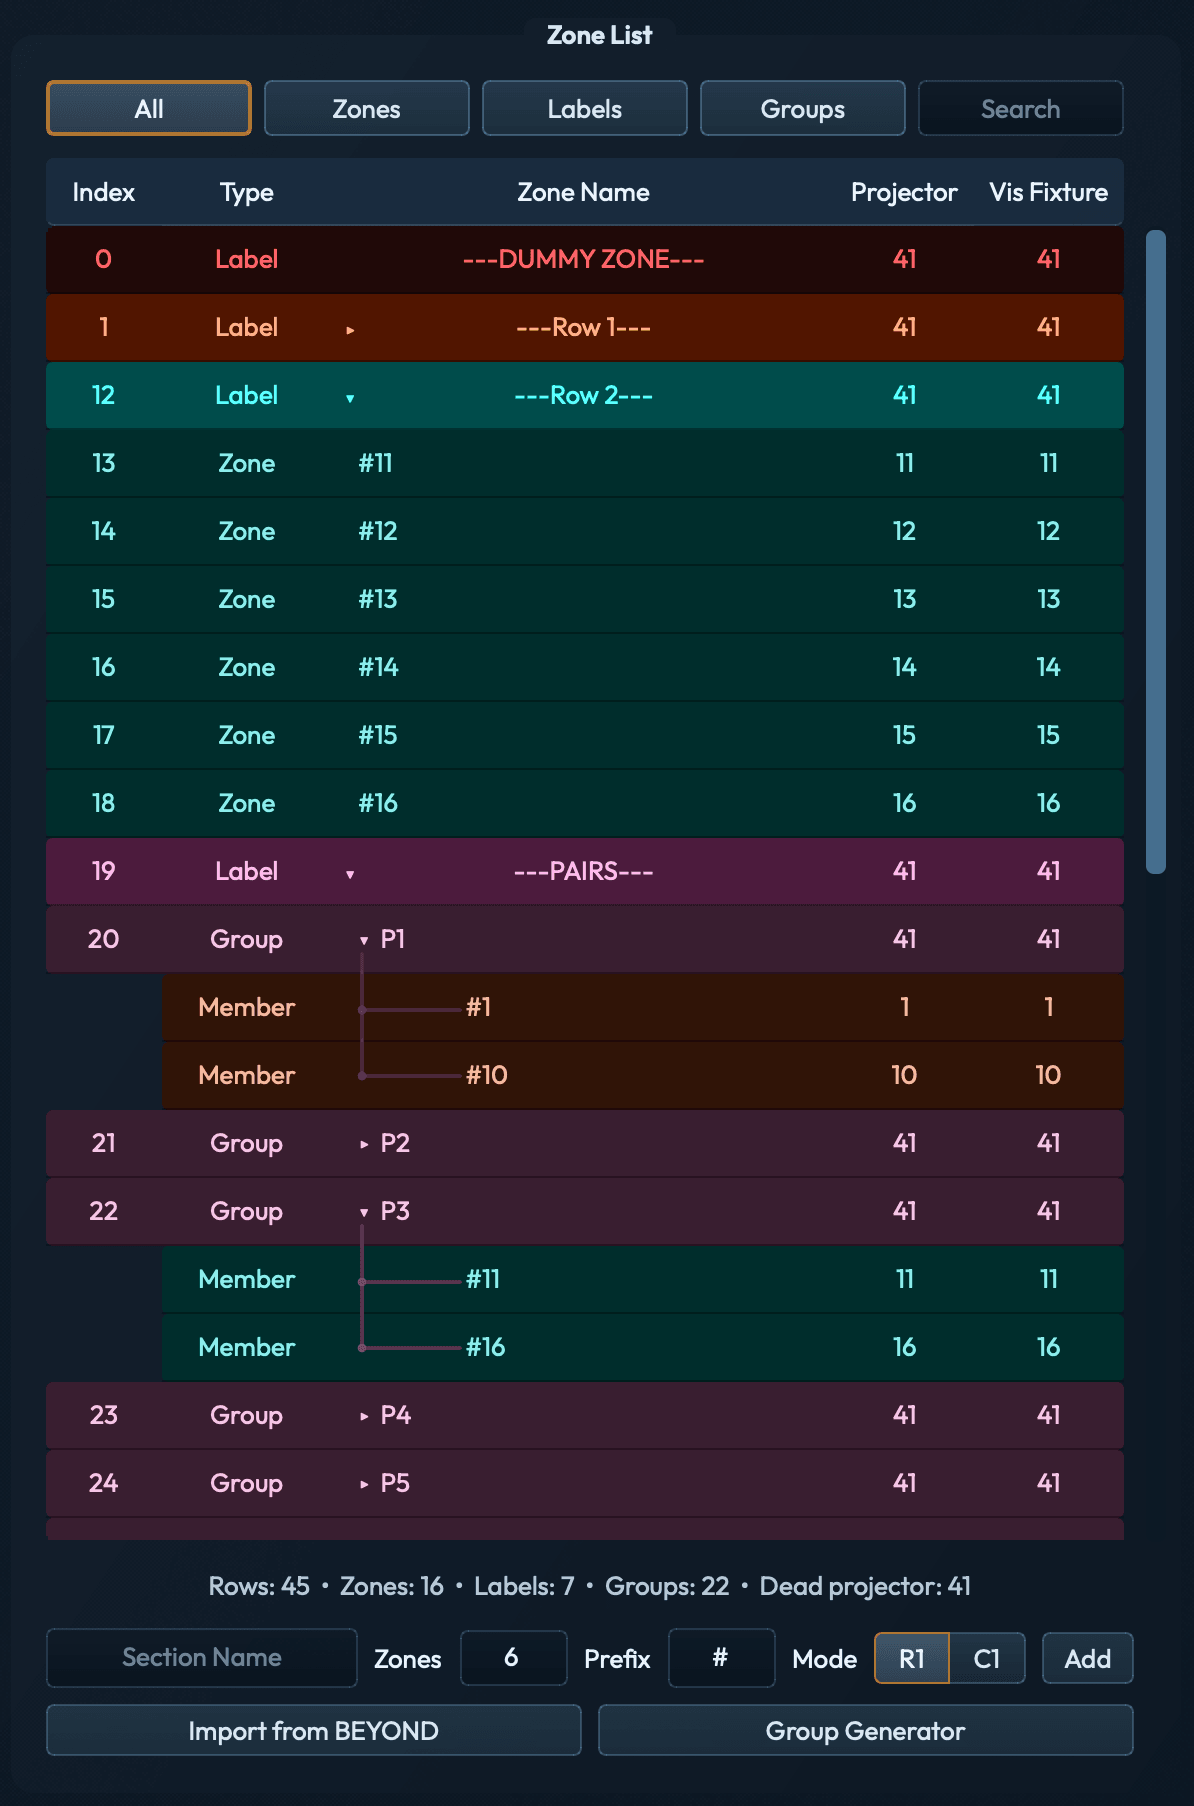
The left card holds the zone list. Each row is one of three types:
- Zone: a BEYOND zone with a name, projector index, and canvas position.
- Label: a section divider in the standard
---SECTION NAME---form. Labels have no position; they just divide the list into sections. - Group: a group of zones. Group rows hold an
Also tolist of zone names; export checks every member exists before writing.
Selecting one or more zone rows highlights them on the canvas and vice-versa. Drag, resize, and nudge edits on the canvas update the row's spinners and the undo stack.
Fixture highlight
Selecting any row in the zone list (zone, label, group, or member) triggers fixture highlight: the row's assigned color is sent to the matching BEYOND zones over Talk TCP, recoloring the laser output live. Tab or click through the list and the beam color tracks your selection, so you can see which projector is which on the rig.
Group rows highlight all member zones simultaneously. The Index column reports the zone index, and the Projector column reports the projector number assigned to each row. Fixture highlight clears automatically when a Send Selected, Send All, or Clear BEYOND Colors is issued, or when the selection is dismissed.
3.2 Importing zones (Build, BEYOND, CSV)
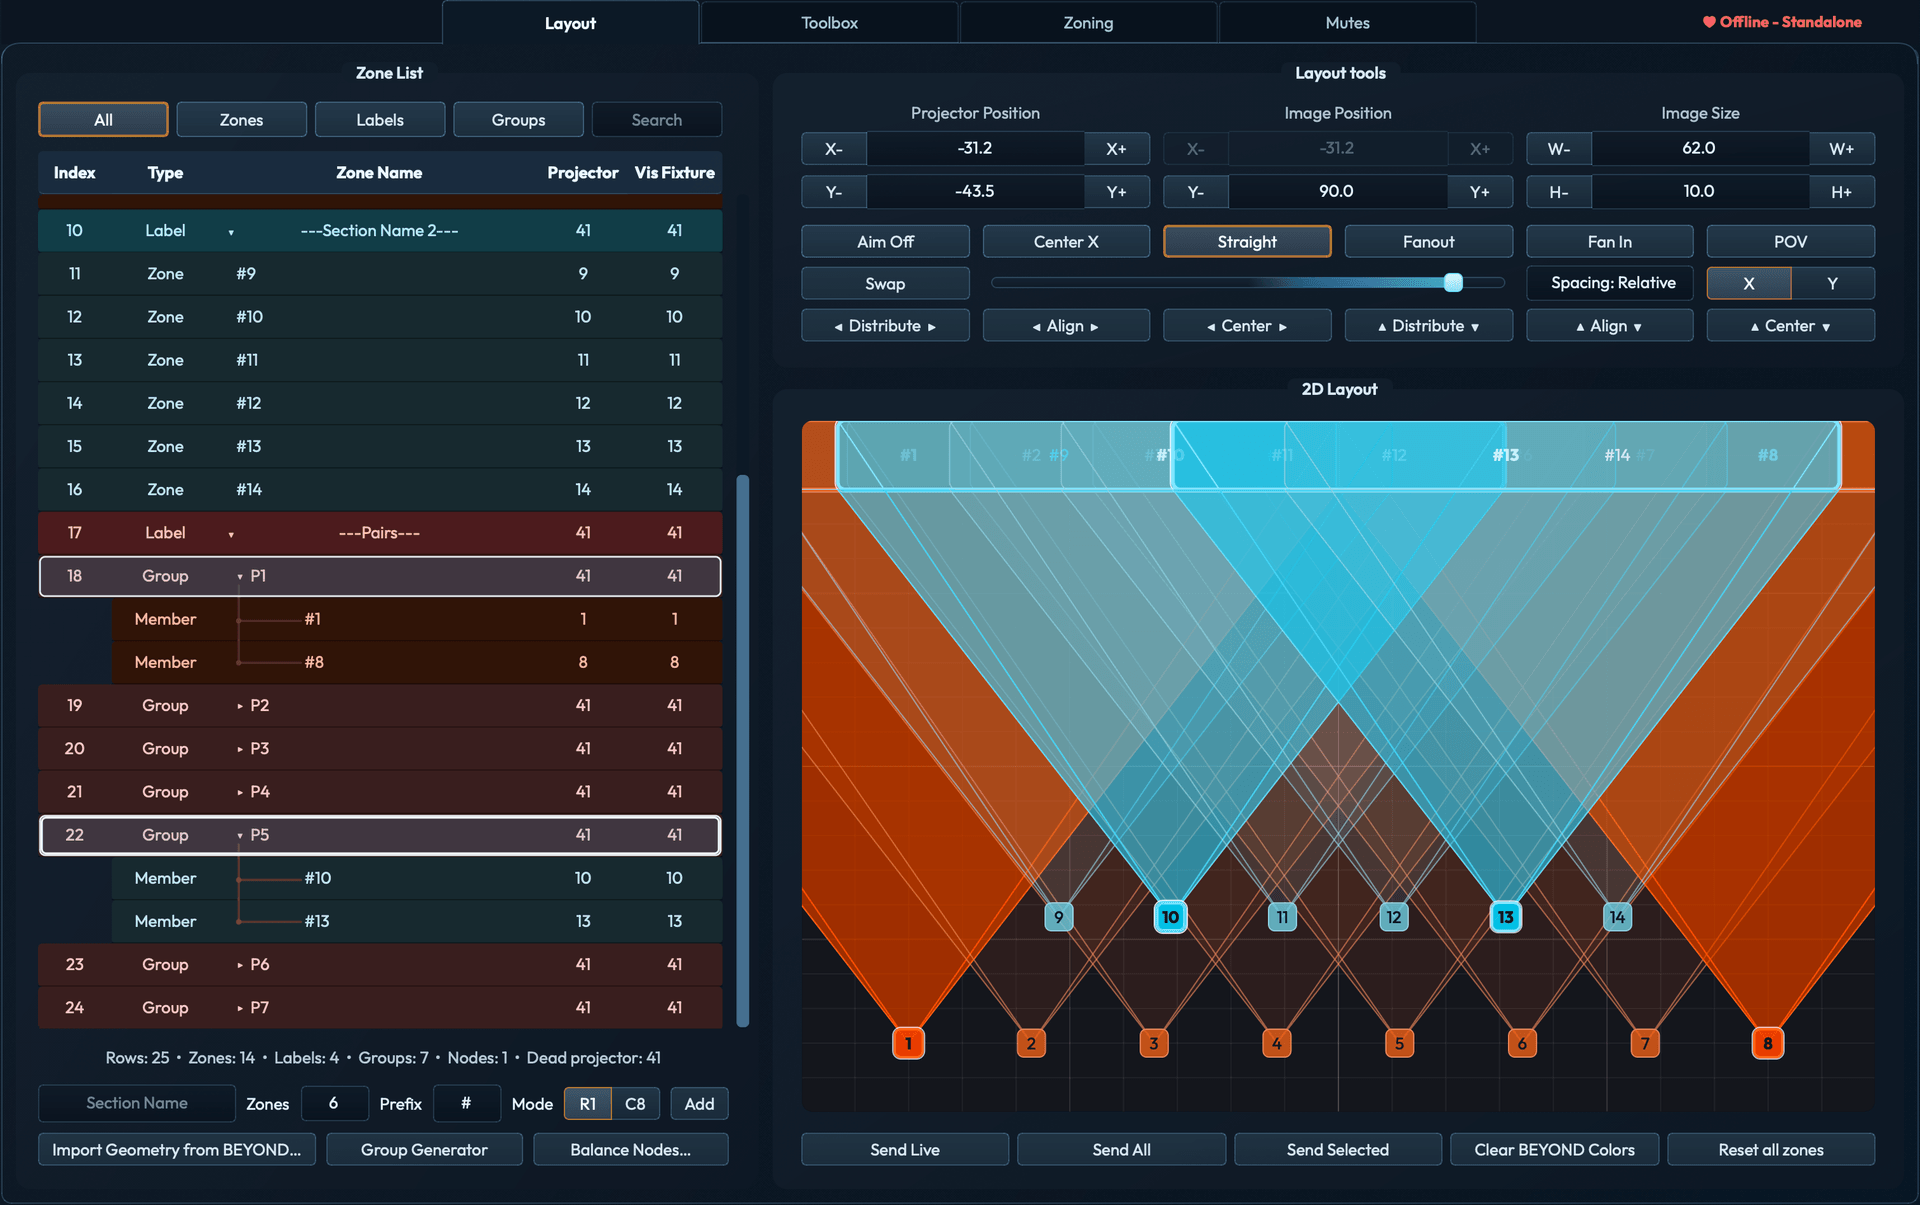
You can populate a fresh profile in three ways:
- Build profile: start from a blank profile and use the section authoring row (see below) to add zones one section at a time.
- Import from BEYOND: read the active Zone List, preview geometry, and UGC geometry from connected BEYOND. The dialog shows each phase and validates the complete readback before replacing the current workspace.
- File → Import CSV…: load a BEYOND zone CSV export. JD3 ZoneTools preserves intentional label rows, group rows, dummy zones, and dead-projector rows on import and export.
⚠Build compatibility. When connected to BEYOND, JD3 ZoneTools warns on CSV export against builds below 2044 that nativeAlso toimport is not supported. Disconnected exports are silent. Match your operator BEYOND build to 2044+ if you rely onAlso toimport.
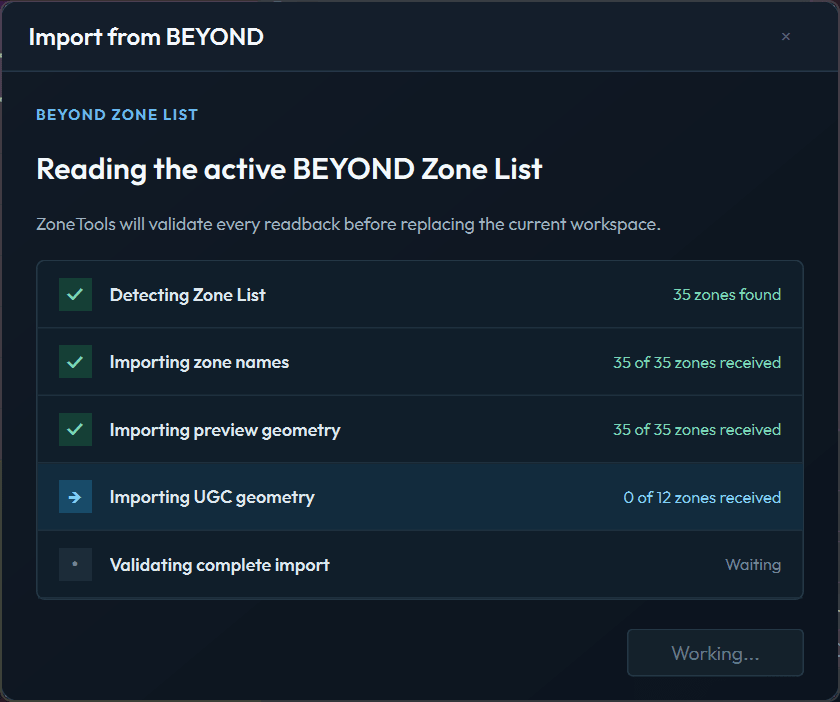
ZoneTools validates every returned name and preview row before replacing Layout. If a row is missing, duplicated, malformed, or late, the existing Layout stays in place instead of being replaced by a partial zone list. UGC geometry is checked separately: if that step fails, the imported names and preview geometry remain while the existing UGC geometry stays unchanged.
3.3 Section authoring
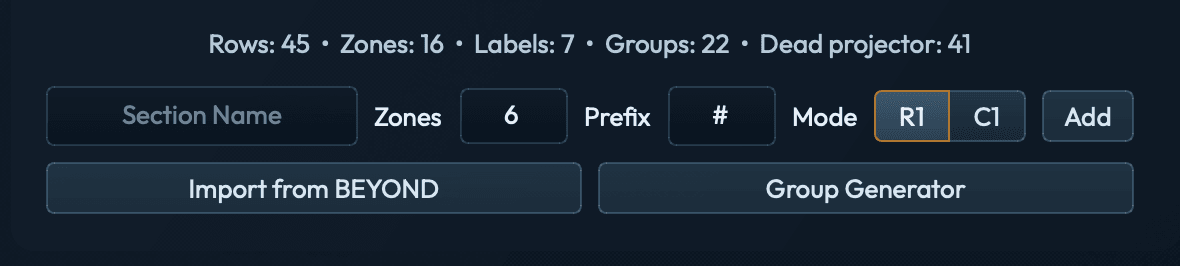
The section authoring row at the bottom of Layout and Toolbox builds a labeled section in one click:
- Section Name: a free-text label that becomes the
---SECTION NAME---divider row. - Zone Count: number of zones to create under the section (default
8, range0–999). - Name Prefix: single-character prefix for the generated zone names.
- Layout Mode:
R1(row) orC1(column). Toggles between a horizontal projector lane and a vertical projector stack. - Add: appends the section divider plus the configured zones to the current zone list.
3.4 Group Generator
Group Generator (button in the Layout section ops row) opens a review card inside the zone list. It reads the current projector layout and proposes helpers in four families:
- Pairs: mirrored pair groups across the rig.
- Groups: global lane-style groupings, including
CENTER,WINGS, andCENTERED(when one or more source zones sit on projector-originX=0). - Columns: mirrored column groupings.
- Pixel Maps: three whole-rig maps (
X Map,Y Map,XY Map) whoseAlso toorder defines how the map traverses the rig.
The review panel shows a list: one row per generated output with an include checkbox, name, member zones, and a regen action. Family chips at the top filter the list without changing what will be generated. Active chips, focus actions, and map-mode buttons all show an amber ring when active.
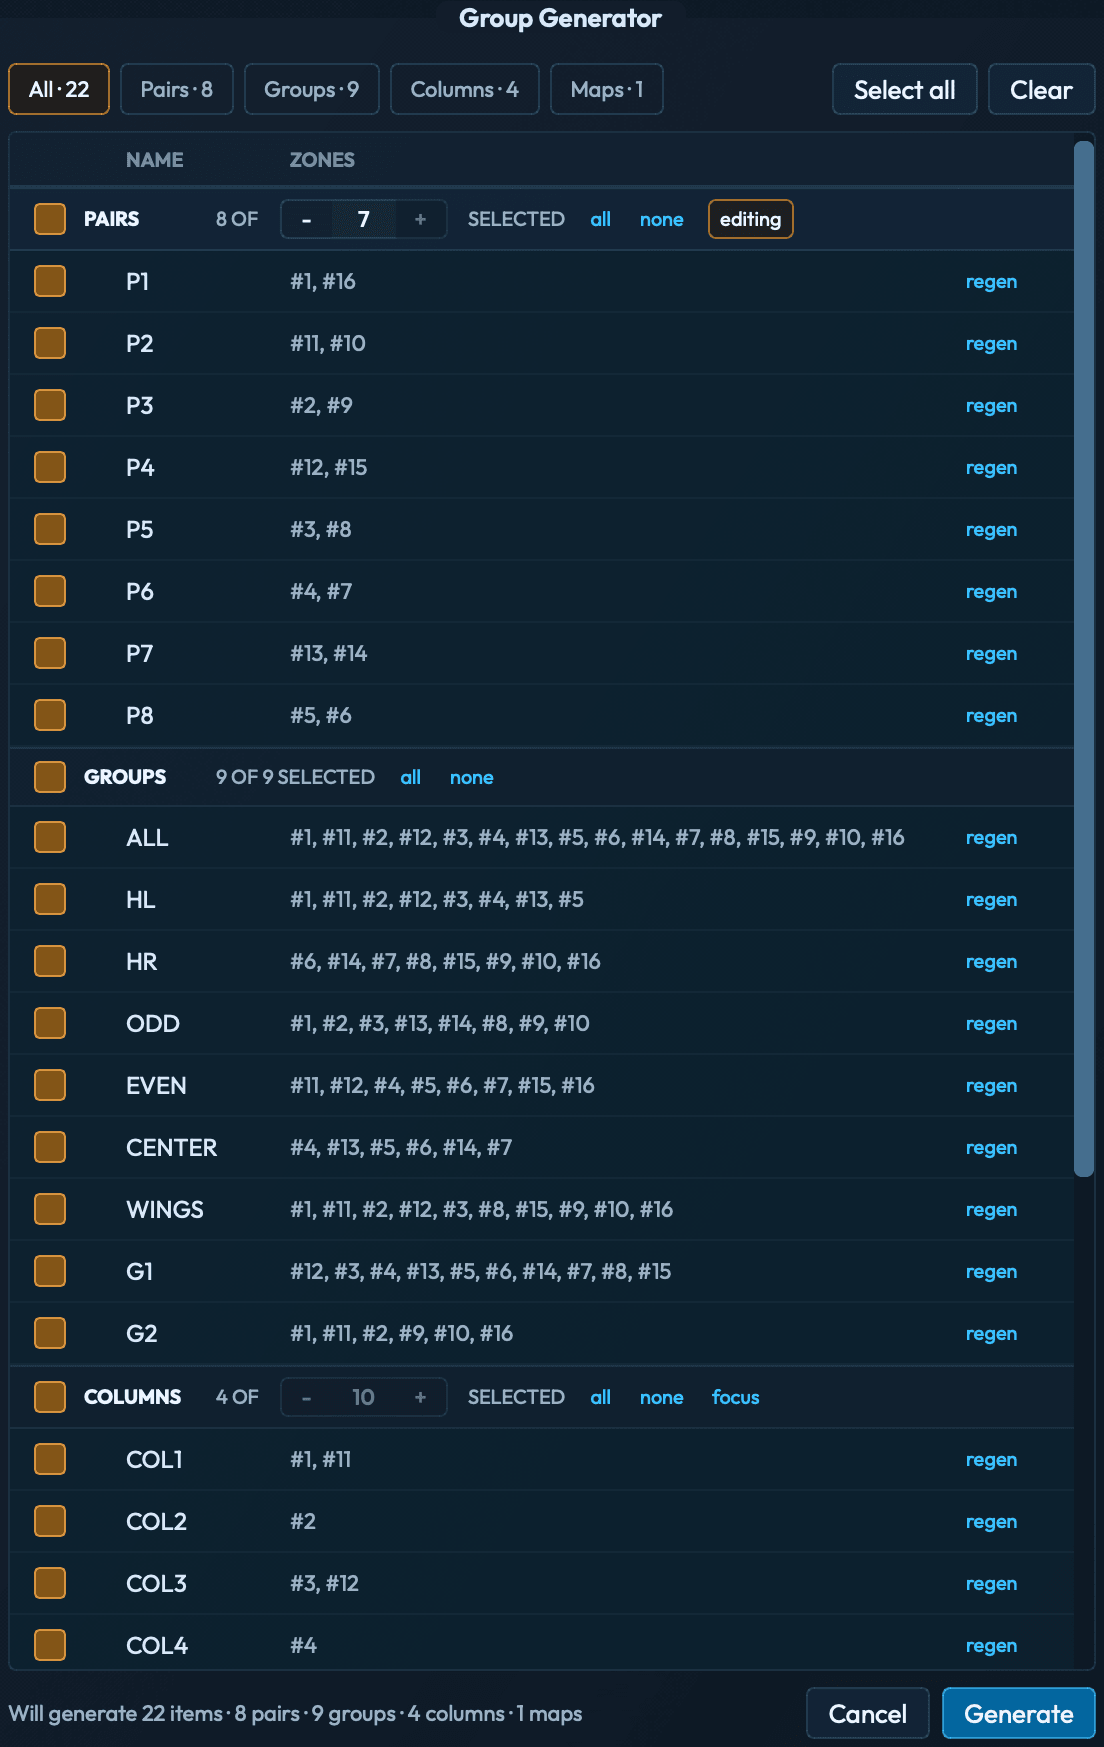
editing focus (amber-ringed), so its canvas overlay is active. The footer shows how many helpers Generate will write.Family include and row include
- Family checkbox in each section header includes or excludes the whole family from bulk Generate. Family rows stay available for preview and row-level regeneration even when unchecked.
- Section header
all/noneselect or clear every row in that family. - Row checkboxes include or exclude individual generated outputs (e.g.
G1,G2,ODD,EVEN). - Family and row include states persist when the generator is reopened.
Focus and live preview
- A section-header
focusaction activates that family's live canvas editor: vertical/horizontal divider guides, color-coded bucket fills, and inline bucket-count controls overlay the preview. - Click
editingagain to clear focus and remove the overlay. - If the focused family is unchecked while another editable family remains selected, focus moves to the next available family automatically.
- Click any generated output row to highlight its member projectors in the preview before applying.
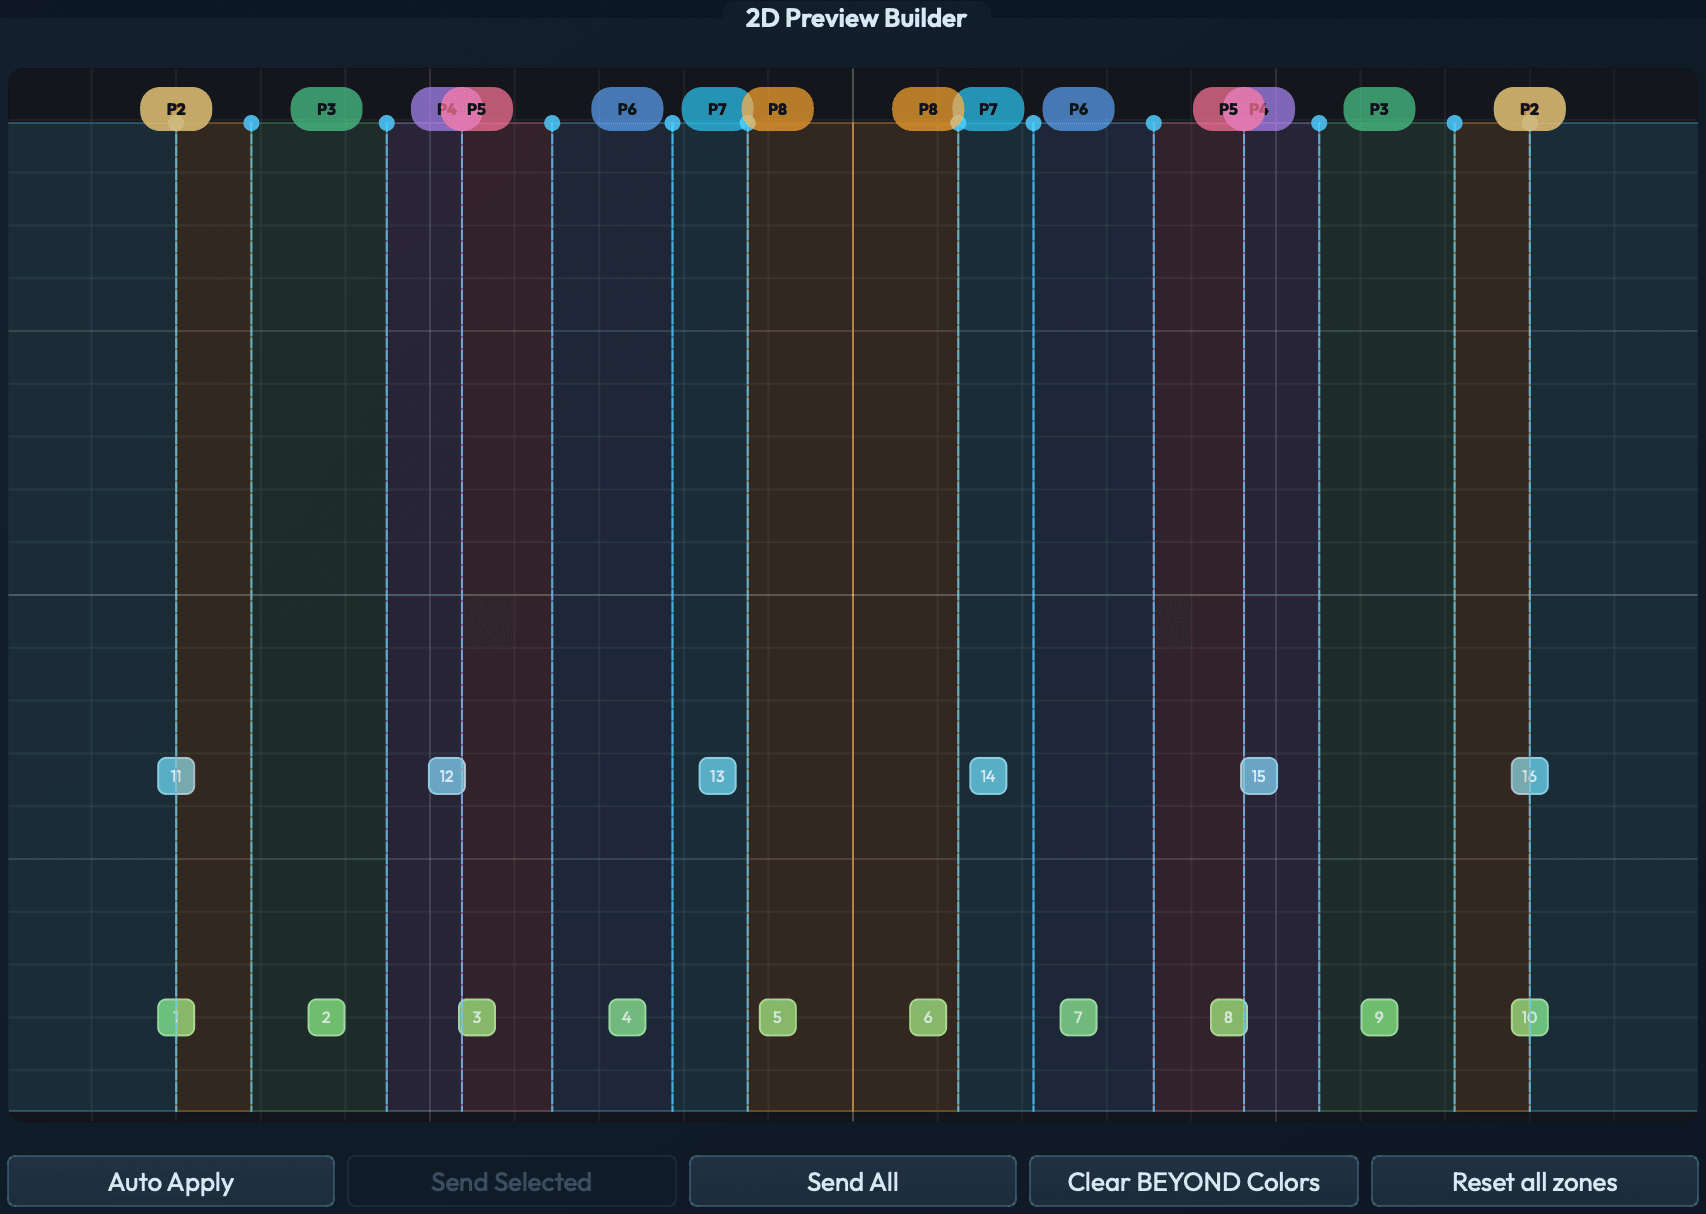
focus: color-coded P-bucket tabs sit over each projector X-stack, with vertical divider guides between buckets. Tab colors match the bucket fills in the review list, so you can read coverage at a glance.Bucket count controls
Bucket count − / + controls appear inline in the matching section header when that family has an adjustable preview overlay. Pixel Map controls appear inline on the X Map, Y Map, and XY Map rows; XY Map stacks its X and Y bucket controls.
P Buckets: pair count. Stepping cycles through valid mirrored-lane counts, so some numbers are skipped. Each bucket covers whole X-position stacks; uneven splits place the extra mirrored lane toward center.C Buckets: column count. Merges or restores whole left-to-right column stacks.- Pixel map buckets: change map ordering only. They do not create per-bucket map rows;
X Map,Y Map, andXY Mapkeep separate bucket layouts.
Drag a divider between bucket regions to widen or tighten before generating. Divider drags snap between projector X stacks; they do not split a vertical stack that shares the same X position.
Reset P Boundariesrestores the math-based pair recommendation for the open review session.Reset C Boundariesrestores the column recommendation.
Per-row regen and helper-bucket rebuild
- A row's
regenaction rebuilds only that generated row from the current layout, preserving sibling generated rows and any manual group rows in the same helper bucket. - Right-click a helper bucket label row in the zone list (e.g.
---PAIRS---,---SECTION A PAIRS---) and choose Rebuild Groups to open the generator scoped to that bucket. Source-zone label rows do not expose this action.
Pair fallback on column rigs
On column-style rigs, default Pairs start from mirrored column pairs instead of one projector per pair. If detected columns do not cover every source projector, pair generation falls back to standard mirrored pairs so outliers remain included.
Footer summary and Generate
The footer summarizes how many pairs, groups, columns, and maps will be generated. Generate writes only the checked families and checked rows into the zone list. Long member lists scroll horizontally inside the review list rather than expanding the embedded card.
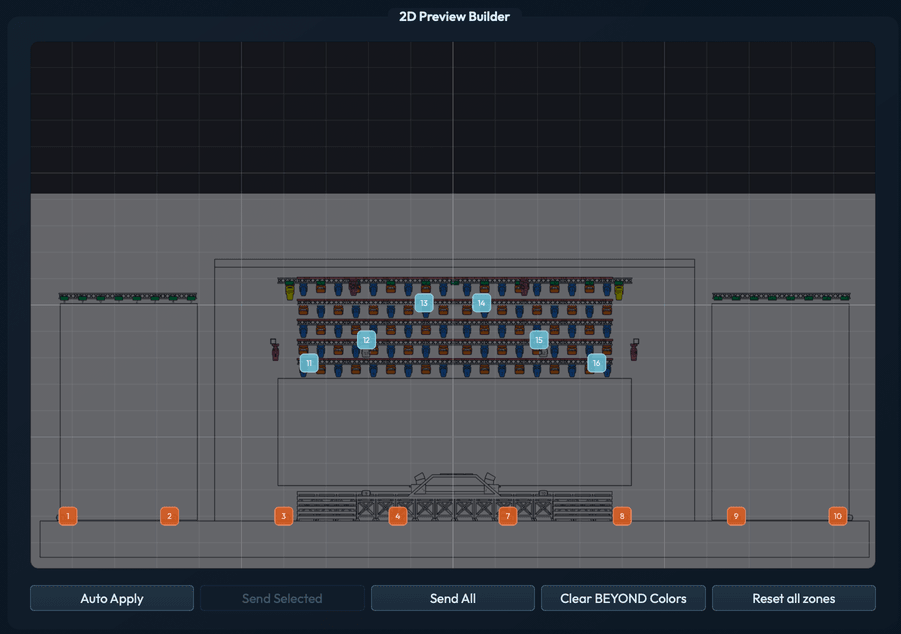
3.5 Sending preview updates
Five buttons sit in the Layout apply controls row:
| Button | Behavior |
|---|---|
| Send Live | Toggle. When on, drag, spacing, nudge, and geometry edits send automatically (briefly debounced). Live edits queue until an in-flight Send All finishes. |
| Send All | Send preview updates for every zone in the active profile. |
| Send Selected | Send preview updates for the currently selected zone rows only. |
| Clear BEYOND Colors | Clear preview colors written to BEYOND for the active profile. Positions and sizes are untouched. |
| Reset all zones | Reset canvas positions and sizes for all zones in the active profile. |

Preview updates target the /b/Zone/{index}/Preview/* OSC endpoints only. They do not change live laser-output safety geometry. See Safety, scope, and data.
Per-message and summary results show up in the Apply Diagnostics panel inside the Configuration dialog.
3.6 Stage plot overlay
A reference image (PDF / PNG / JPG / BMP) can be loaded behind the canvas as a stage plot overlay so you can position zones against the venue layout.
- File → Load Stage Plot Overlay…: pick an image file.
- File → Edit Stage Plot Overlay…: open the overlay editor (position, scale, opacity).
- File → Clear Stage Plot Overlay: remove the overlay.
The overlay is visual reference only, not exported to BEYOND or saved to the zone list.
§ 04Toolbox
Toolbox shares the zone-list/profile model with Layout; use it when you don't need the canvas:
- Direct row-type edits via context menus (
Zone↔Label↔Group). - Section grouping and spatial ordering of an existing list.
- CSV import/export, including BEYOND-style projector assignments, dummy zones, and dead-projector rows.
- Invert Helper for computing and applying SR/SL splits, column alternates, and other rig-wide invert looks in one click.
The same authoring controls (Section Name / Zone Count / Name Prefix / Layout Mode / Add) are available, plus Import from BEYOND and Group Generator entry points.
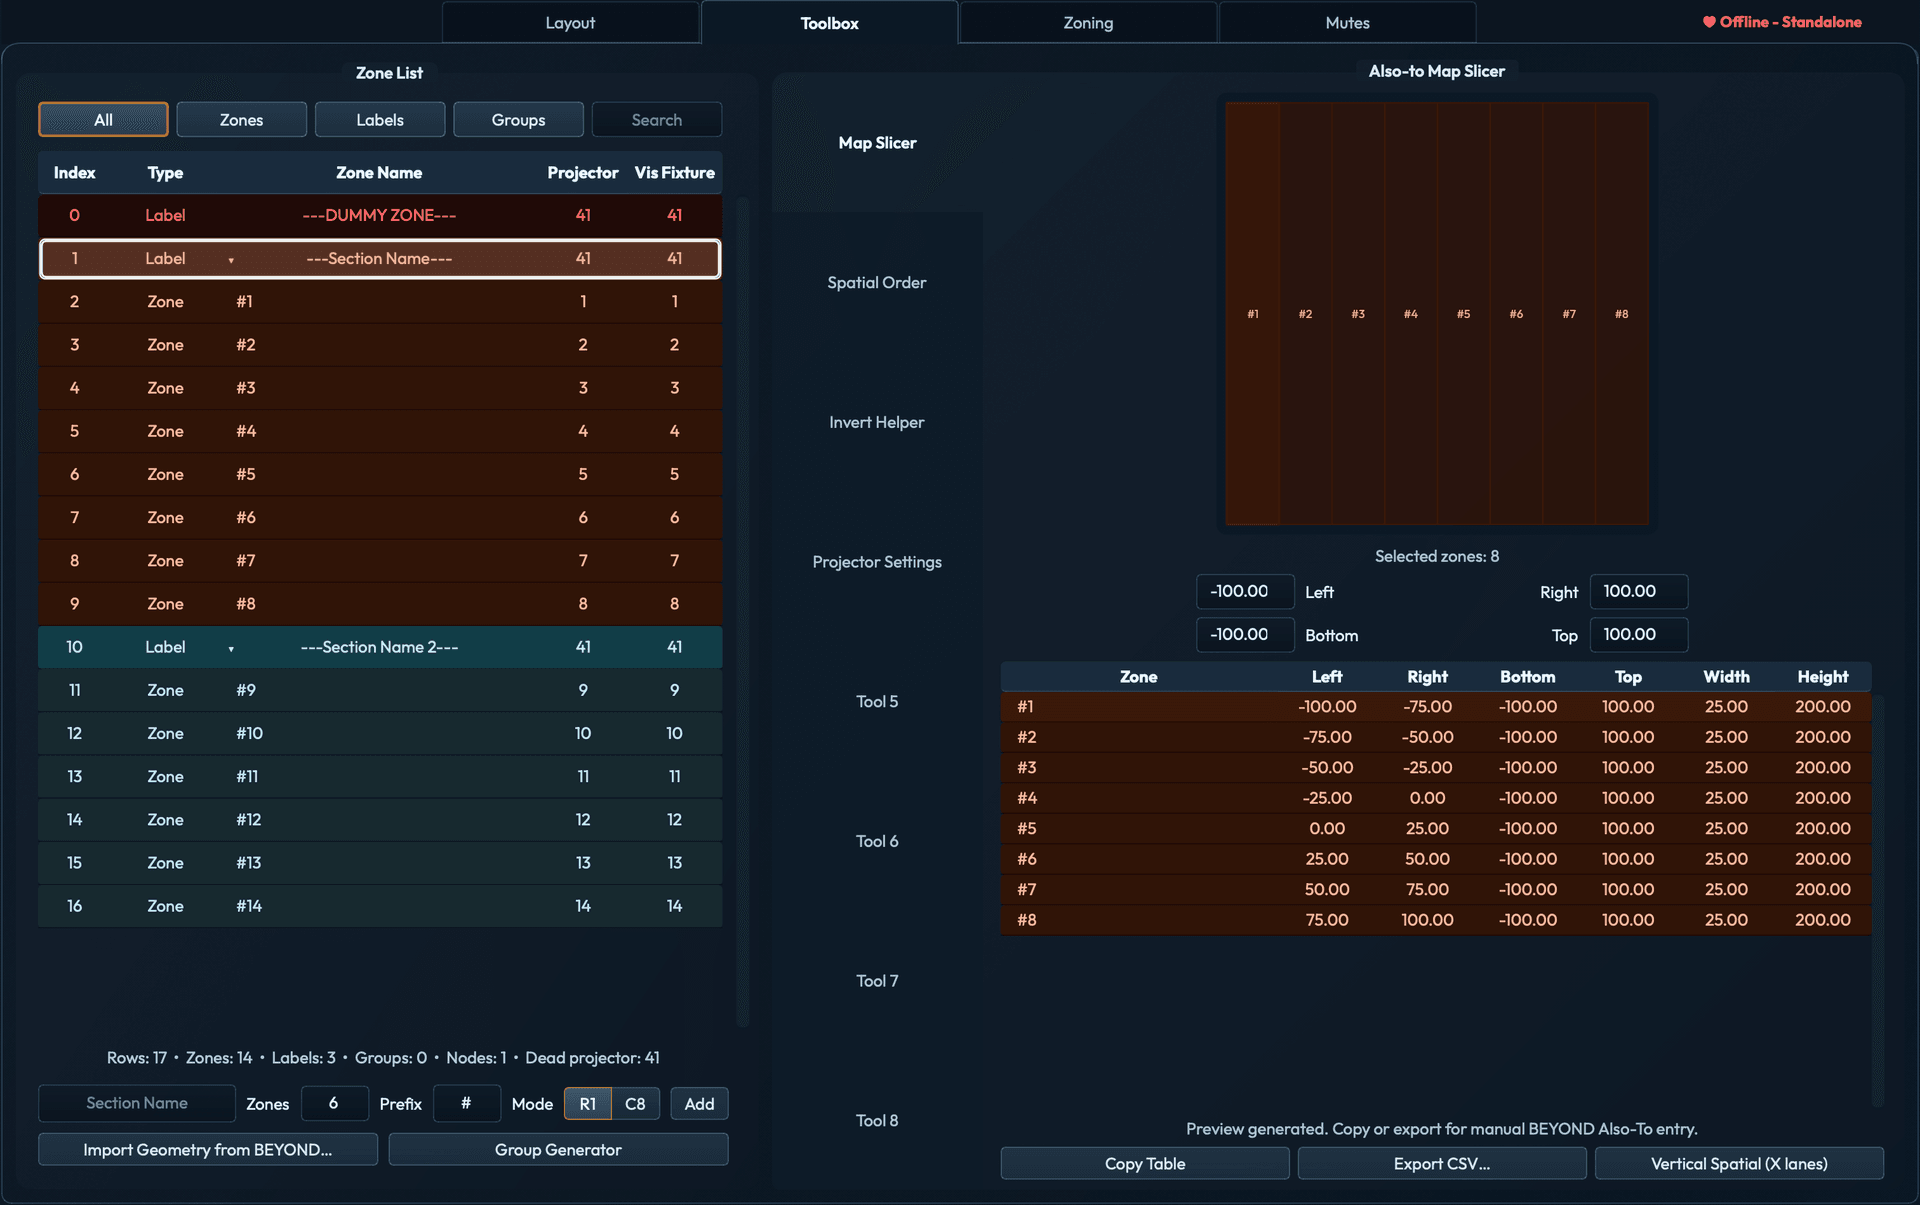
Also-to Map Slicer
The Also-to Map Slicer computes pixel-map left and right bounds for every zone in a section. Click any section label in the zone list and the Also-to Map Slicer auto-populates bounds for the whole section. Values follow projector positions on the canvas instead of being split evenly.
Marquee-select any subset of zones on the canvas and the table updates live to reflect the selection. When the values look right, use Copy Table to put them on the clipboard for pasting into BEYOND, or Export CSV… to write the table to disk. Vertical Spatial (X lanes) applies equal-width vertical slices from the current profile's projector X lanes.
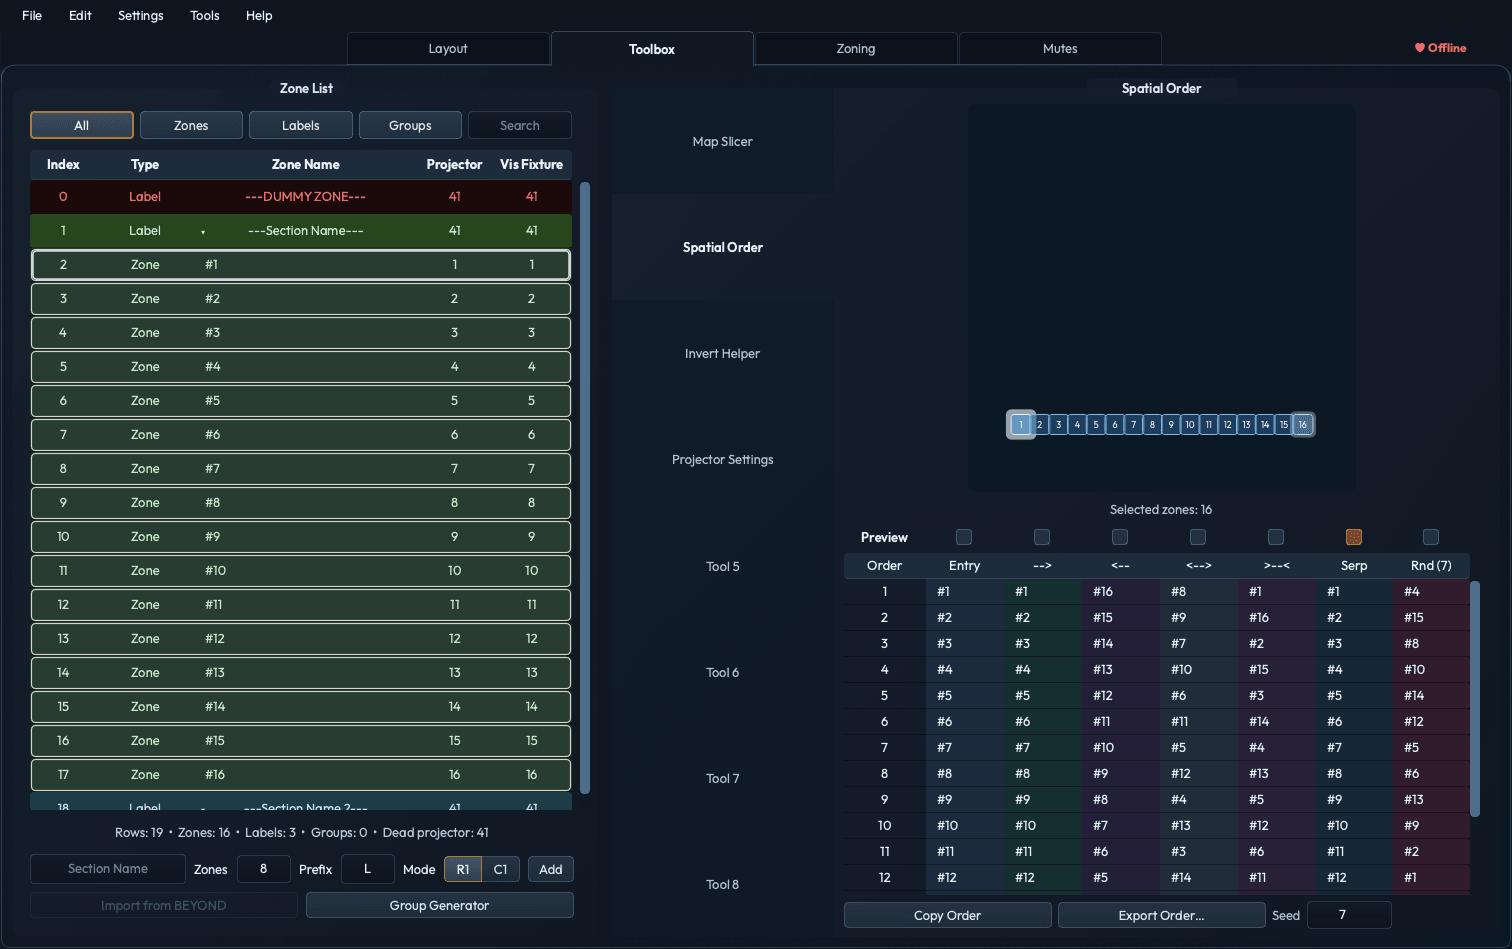
Spatial Order
The Spatial Order tool defines the traversal sequence of zones for pixel-map export and ordered group operations. A canvas shows the zones as color-coded tiles linked by the traversal path; a table next to it lists one row per zone with a column per ordering mode:
- Entry: keep the existing zone-list order.
- -->: left-to-right by X position.
- <--: right-to-left by X position.
- <-->: outward (center-out) radial ordering.
- >--<: inward (edge-in) radial ordering.
- Serp: serpentine (boustrophedon) traversal, alternating direction on each row.
- Rnd: random order, seeded by the Seed field so the same seed always produces the same sequence.
Select a column to set the active ordering. The visual canvas updates immediately to show the resulting traversal path. Copy Order puts the sequence on the clipboard; Export Order… writes it to disk.
Invert Helper
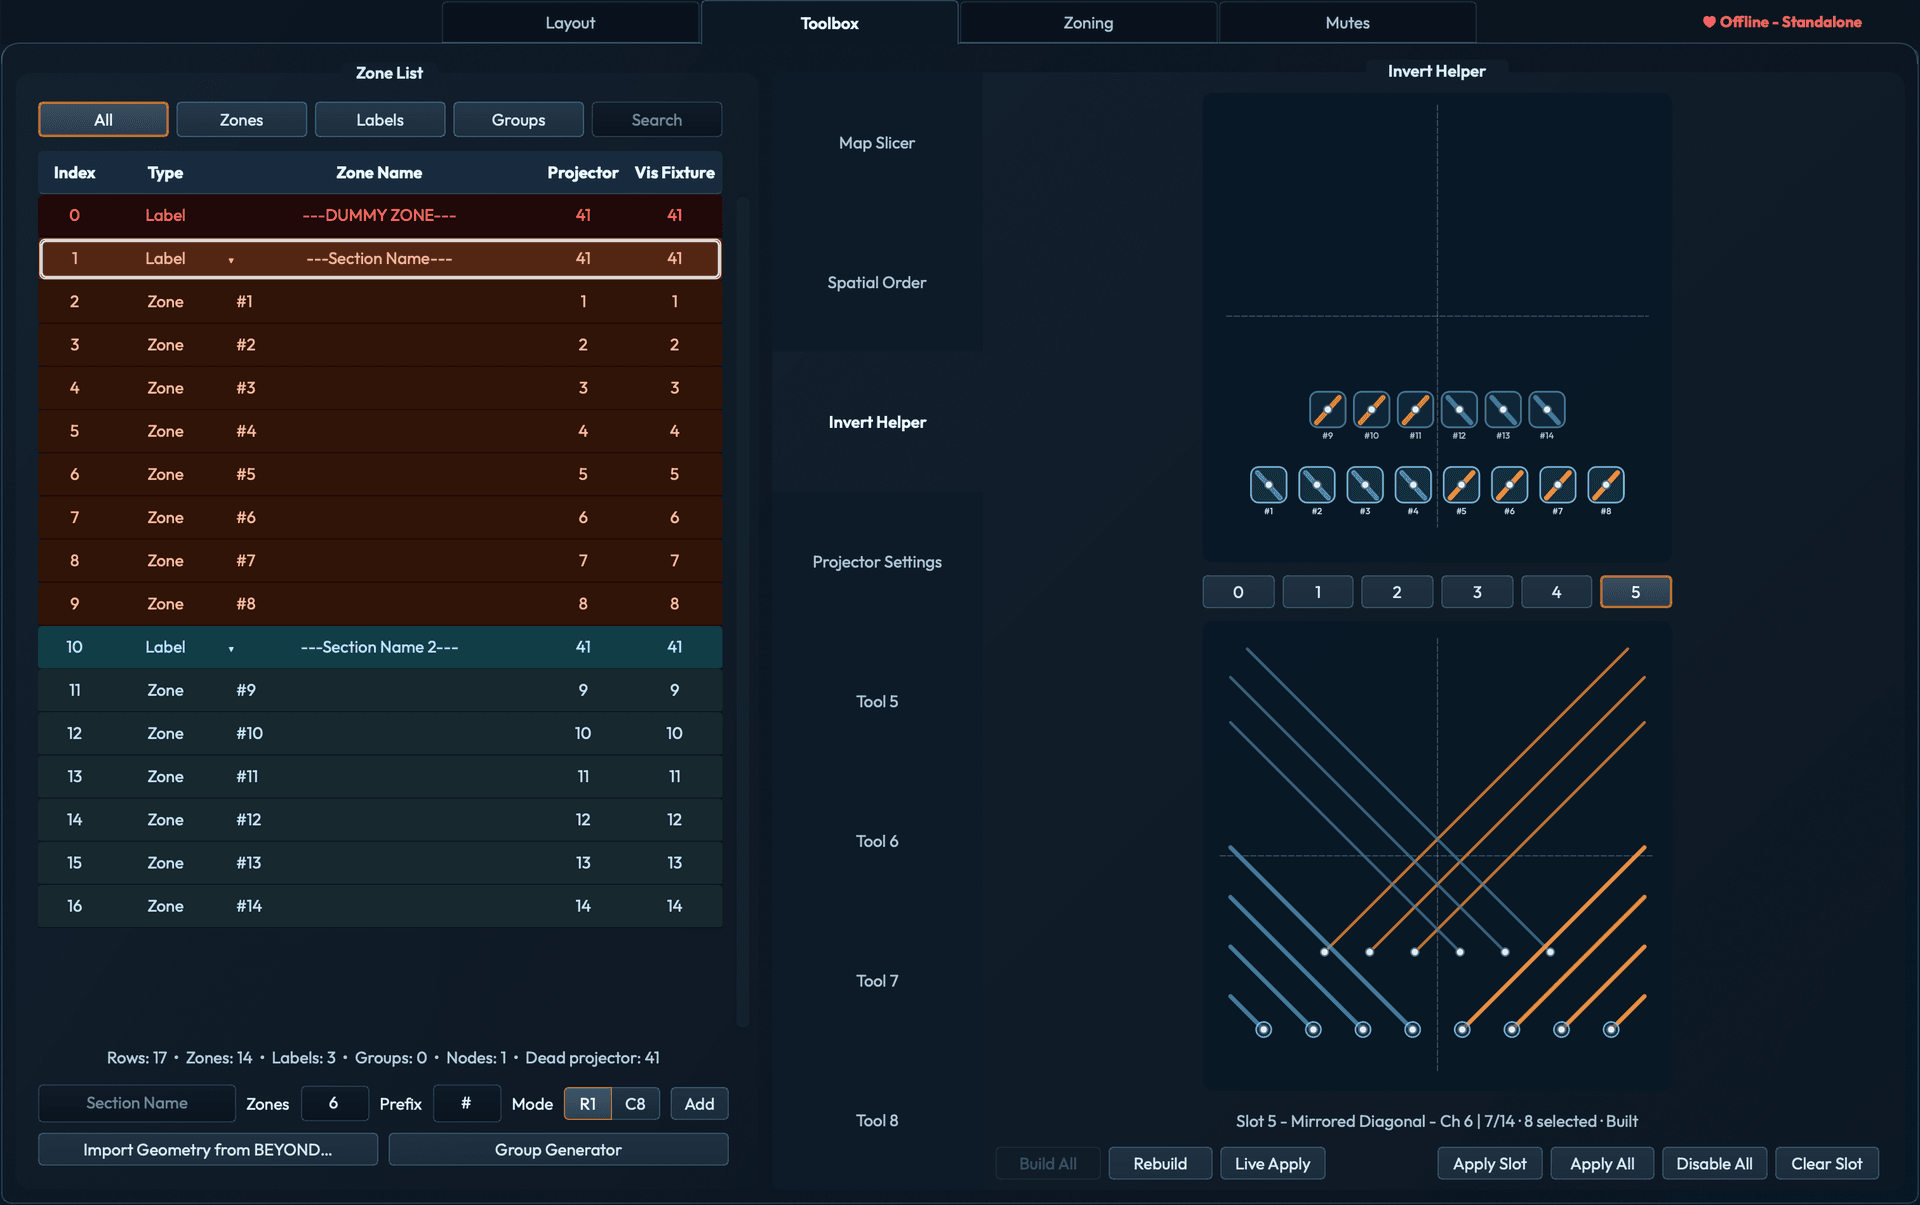
The Invert Helper builds the key-effect assignments for six spatial invert looks, one per BEYOND channel. The workflow is:
- Place six key effects into each BEYOND zone, each sized at
−100×(nulls the zone when active). - Assign a BEYOND channel to each of the six slots in the Invert Helper. The selector labels them 0–5; 0 is the first slot, not an off state, and carries an invert type like any other.
- Choose an invert type per slot. ZoneTools picks which zones to mute or unmute for that channel based on projector position.
- Hit Build All or Apply Slot to push the mute/unmute commands to BEYOND, creating the desired invert combination across the rig.
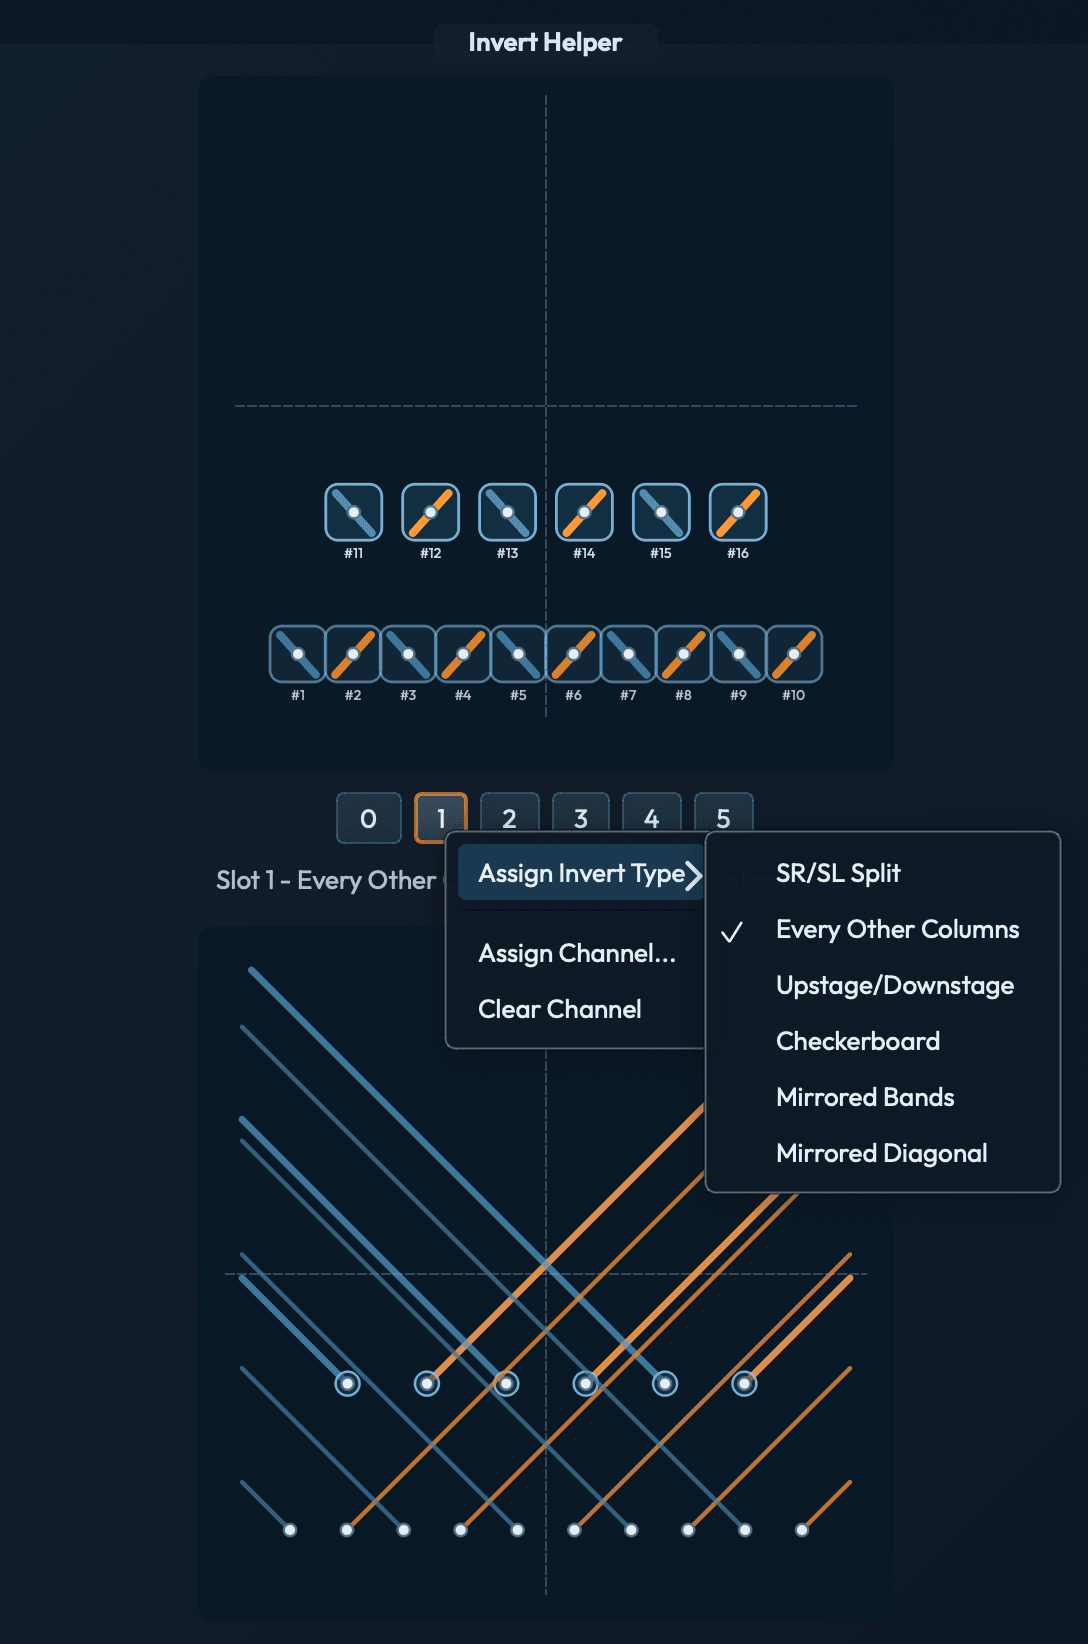
Six invert types are available:
- SR/SL Split: stage-right half vs. stage-left half.
- Every Other Columns: alternating column-wide lanes across the rig.
- Upstage/Downstage: front-of-house half vs. rear half by Y position.
- Checkerboard: alternating zones in a checkerboard grid.
- Mirrored Bands: symmetric horizontal bands radiating from center.
- Mirrored Diagonal: diagonal split mirrored about the rig center.
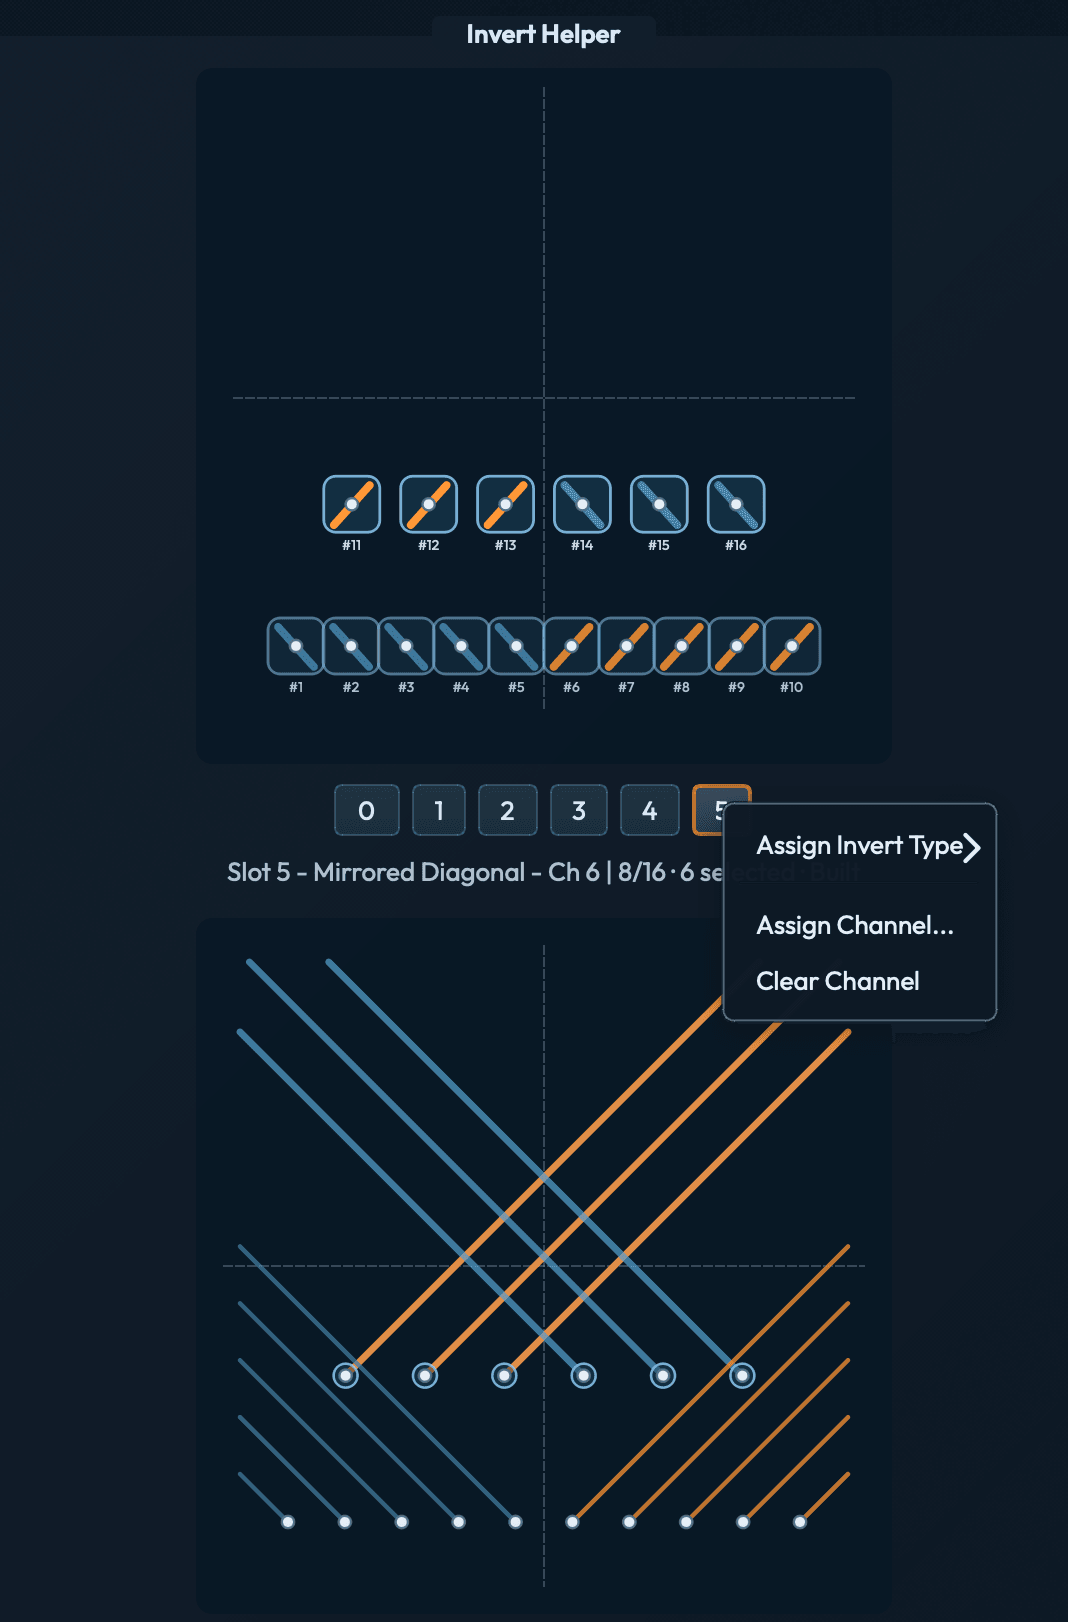
The slot selector (0 · 1 · 2 · 3 · 4 · 5: six slots, one per invert type) switches the active view. The status line below the selector reports the slot's invert type, assigned BEYOND channel, how many zones are selected, and whether the slot has been built. The canvas shows which zones are active vs. muted for the selected slot.
Right-clicking any slot opens a context menu with three actions:
- Assign Invert Type: submenu listing all six spatial patterns.
- Assign Channel…: pick the BEYOND channel this slot drives.
- Clear Channel: remove the channel assignment from this slot.
⚠Group export integrity. CSV export validates group rows before writing, and blocks the export if any Also to member no longer resolves to a zone in the active profile. Recovery steps are in § 12.§ 05Zoning
The Zoning tab covers User-Generated Correction (UGC), test frames, and laser output. Zoning can affect live laser output, so it sits on its own tab with explicit guards.
Zoning runs in either of two modes, picked by the Role setting in Settings → Configuration… → Remote Session / Node Setup:
- Standalone: one machine talking to the local BEYOND. No session, no remote clients, no pairing.
- Multi-node session: one or more BEYOND machines (
Node 1throughNode 10) share a session, plus optionalRemoteoperator clients.Node 1hosts the session, and each BEYOND computer talks directly to its own local BEYOND instance. See 7.2 Remote Session for the full role and pairing model.
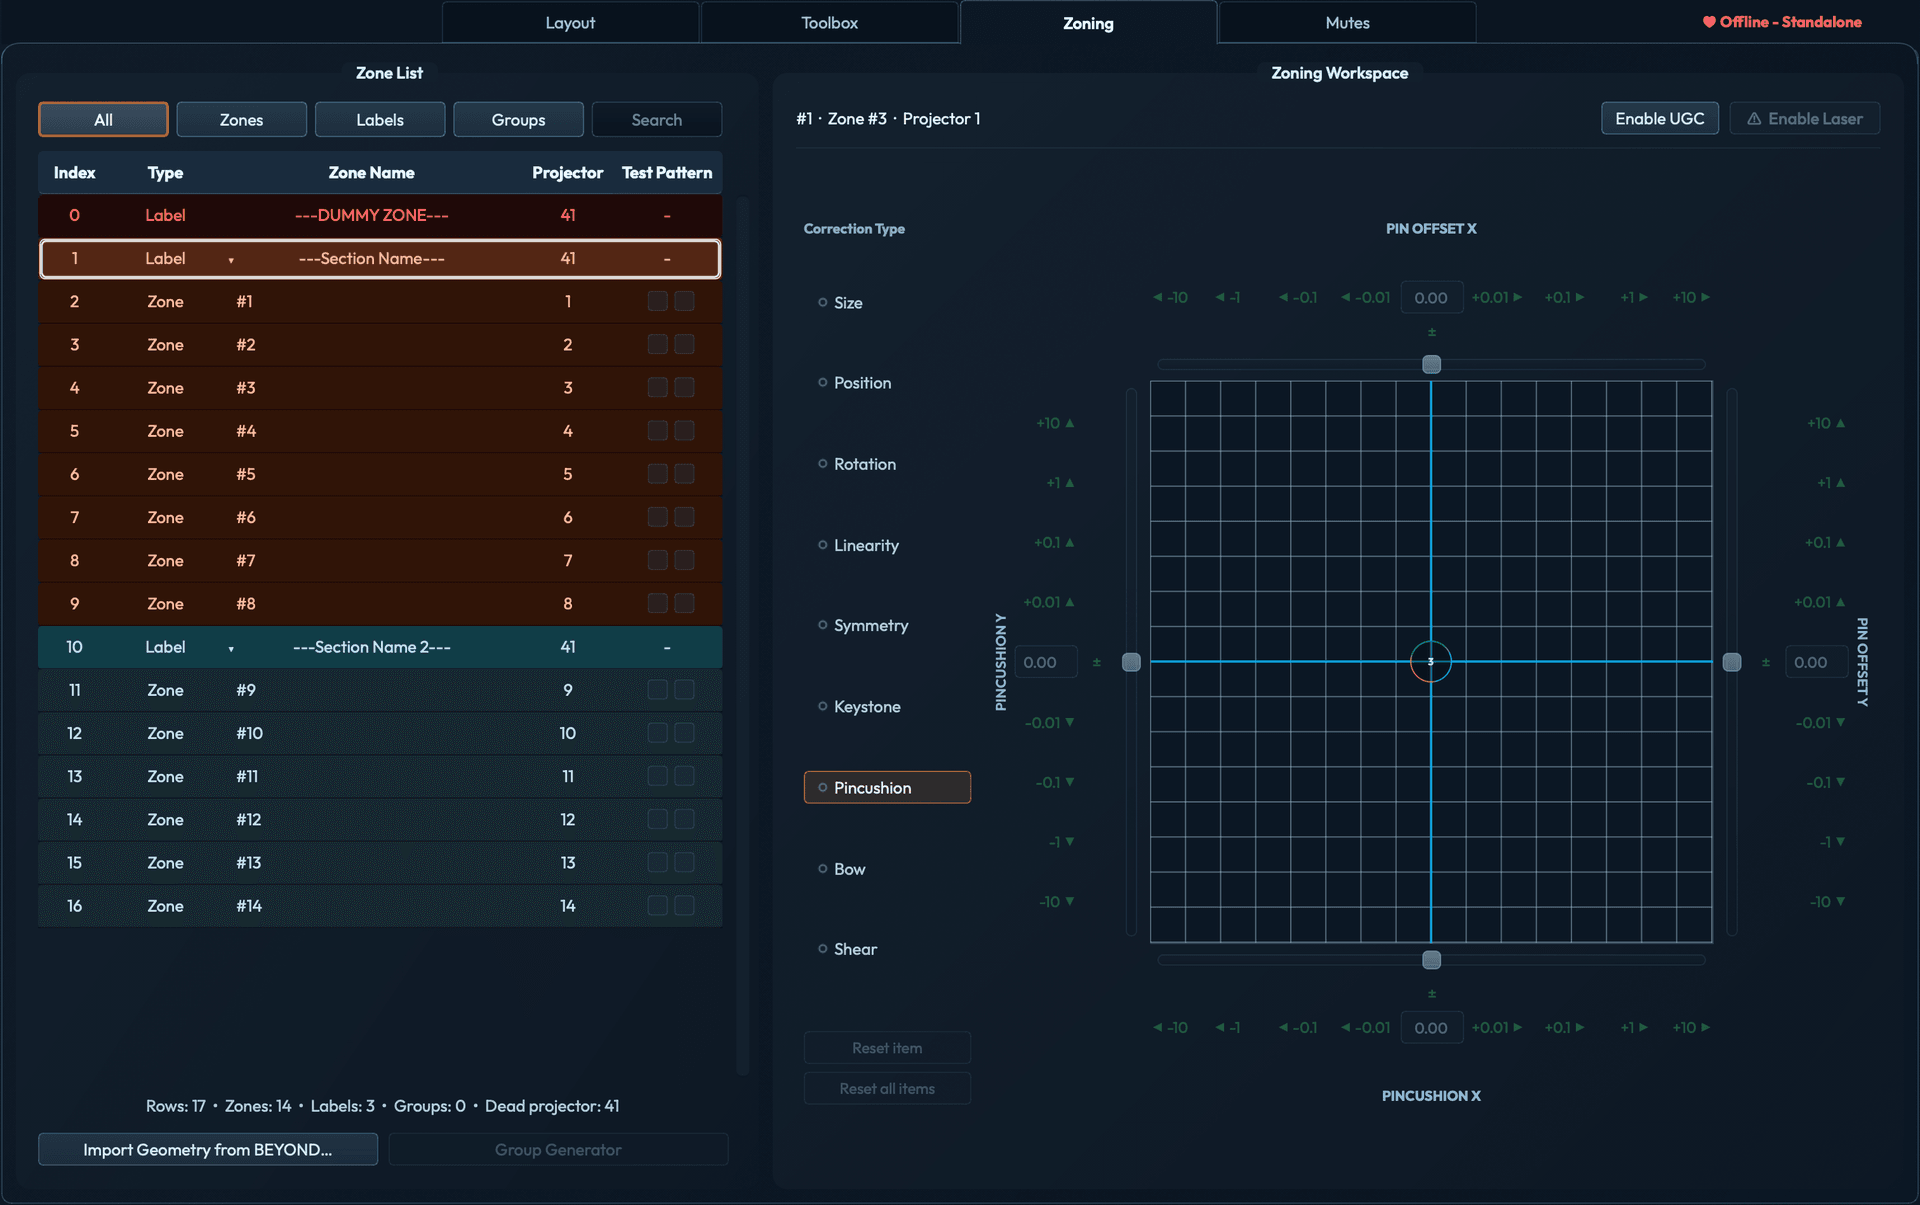
Zoning includes:
- A live correction-grid preview for the selected zone, with vertex editing.
- +10 nudge buttons next to the per-pixel controls, for big jumps.
- Per-row test-frame controls (Box / Grid). Multiple zones can run test patterns at once.
- Enable and disable laser output, with a confirmation prompt.
- Laser output and test frames clear when you leave the tab.
- In shared sessions: a node chip strip for switching the visible BEYOND computer, an edit-status indicator (
OWNED/FOREIGN/No owner) showing whether you can change the selected zone, and connection status for each BEYOND computer. - If a Remote disconnects during correction, Node 1 tells that Remote's target Node to disable laser output. This app-level protection does not replace the hardware safety system described below.
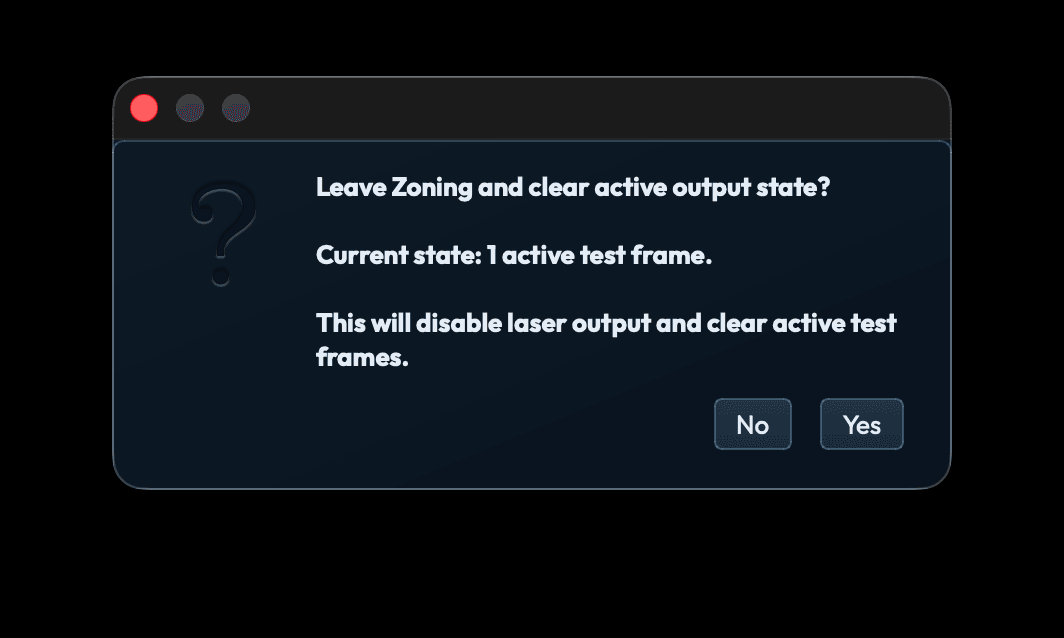
When you navigate away from the Zoning tab while laser output is active or a test frame is running, ZoneTools shows a confirmation dialog with the current output state and asks whether to proceed. Choosing Yes disables laser output and clears all active test frames before leaving; choosing No keeps you in the Zoning workspace.
◆Concurrent edit protection. Node 1 tracks which operator has each zone open. You can edit a zone when its status isOWNED;FOREIGNmeans another operator has it open. After reconnecting, select the zone again before continuing.
⚠Operator responsibility. Zoning affects live laser output. JD3 ZoneTools doesn't know about beam paths, audience separation, scan-fail behavior, or any other laser-safety concern. The authority watchdog runs inside the app; it can't disable output if the app crashes, freezes, or the machine loses power. Hardware E-stop, BEYOND's own safety behavior, and your own procedures are the final safety layer.
§ 06Mutes
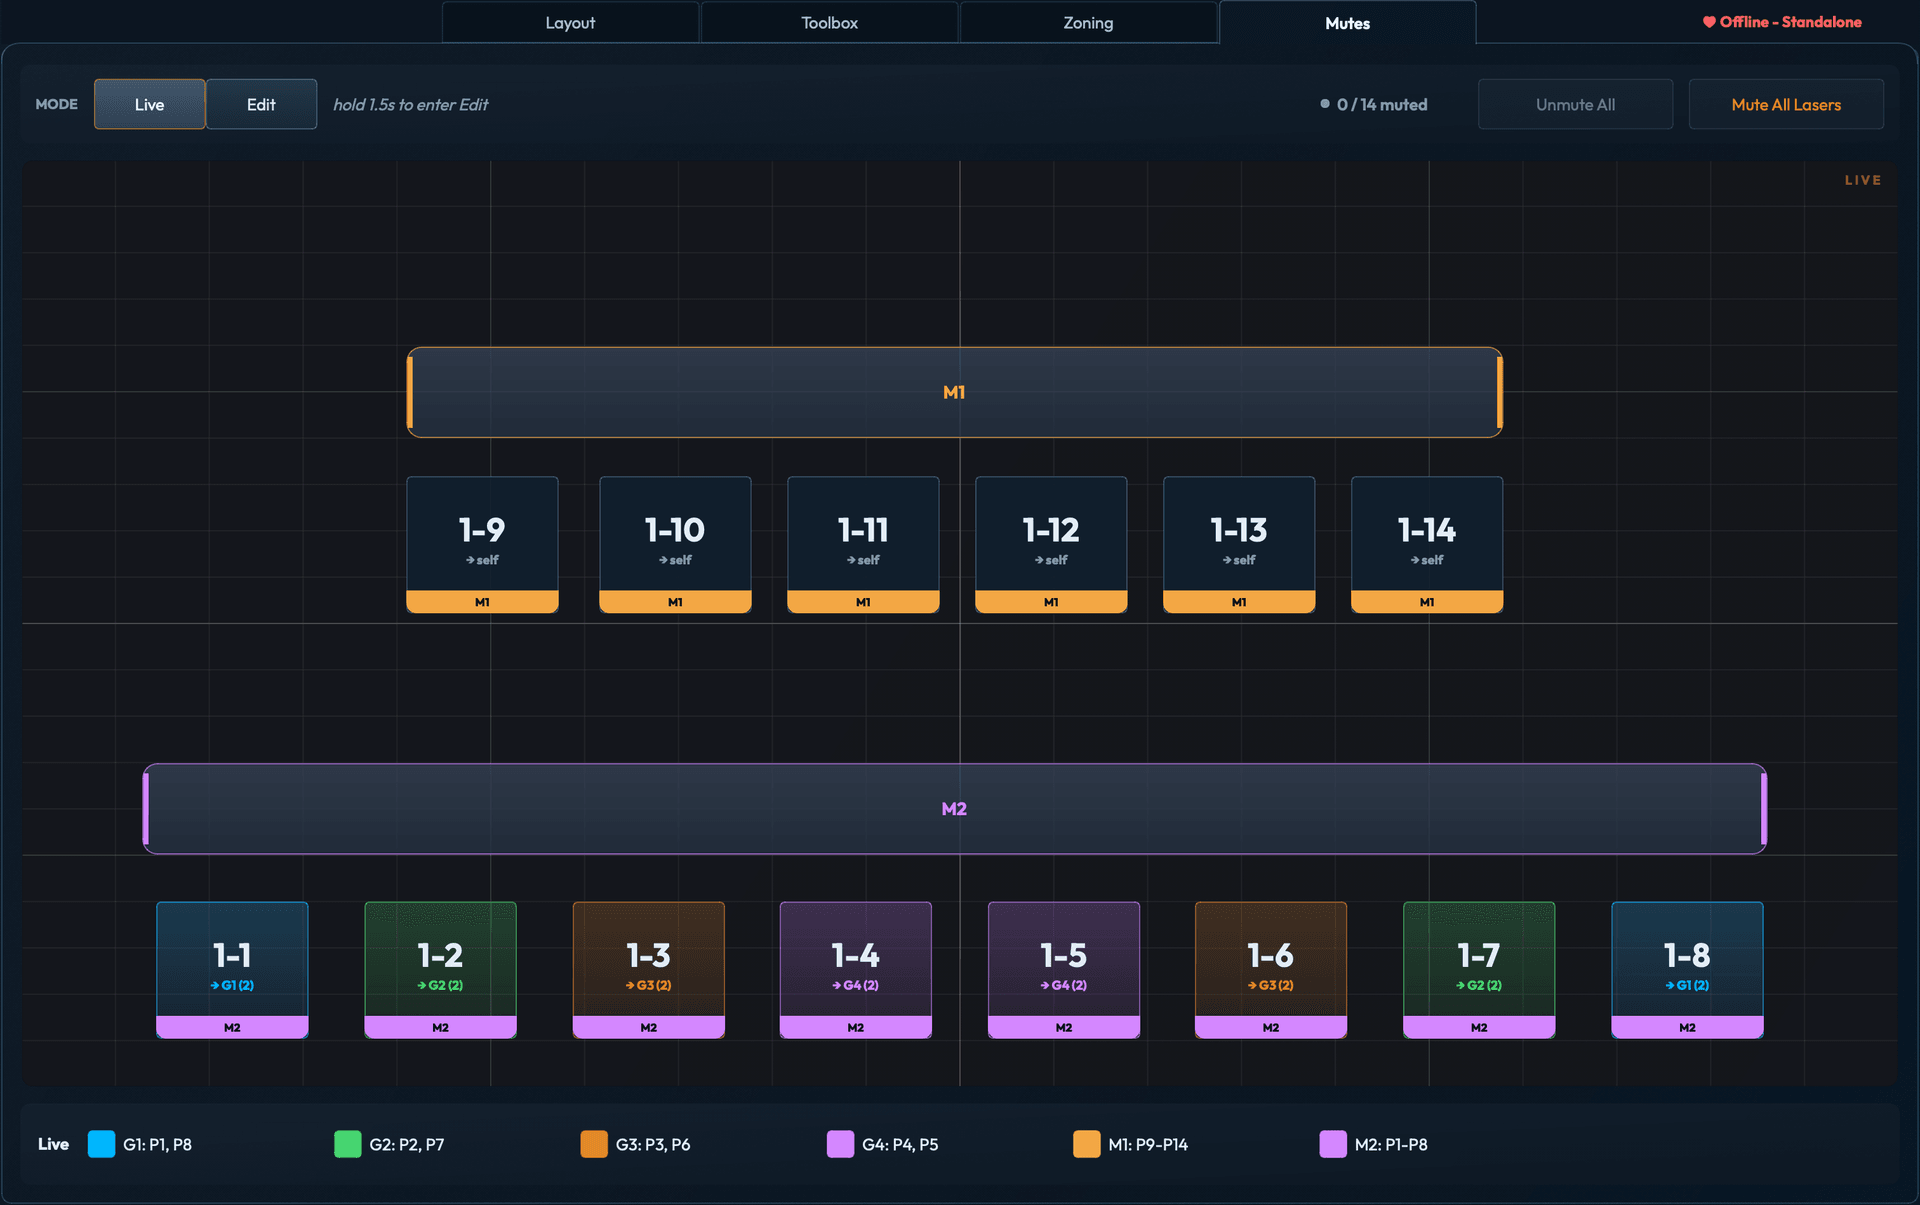
The Mutes tab has two modes: Live for muting, Edit for setting up groups and tile layout. The mode toggle at the top of the tab switches between them.
6.1 Live mode
Live mode sends PangoScript mute commands to BEYOND over Talk TCP (fixed port 16063) immediately as you click. Tiles follow projector positions in the active zone profile, so the layout matches your rig.
Every projector gets its own tile. Clicking a tile toggles it independently. Pair groups sit under their master banner; clicking any tile in a pair group mutes the other tiles in that group. Master banners span their assigned tiles; clicking a banner mutes or unmutes every projector in that master. Muted tiles render red; active tiles render amber. The mute counter top-right tracks how many projectors are currently silenced.
Three global actions:
- Per-projector toggle: click any projector tile to mute or unmute it individually.
- Mute All Lasers: mute every projector in the configured workspace.
- Unmute All: unmute every projector in the configured workspace.
The footer lists every active mute by group and master.
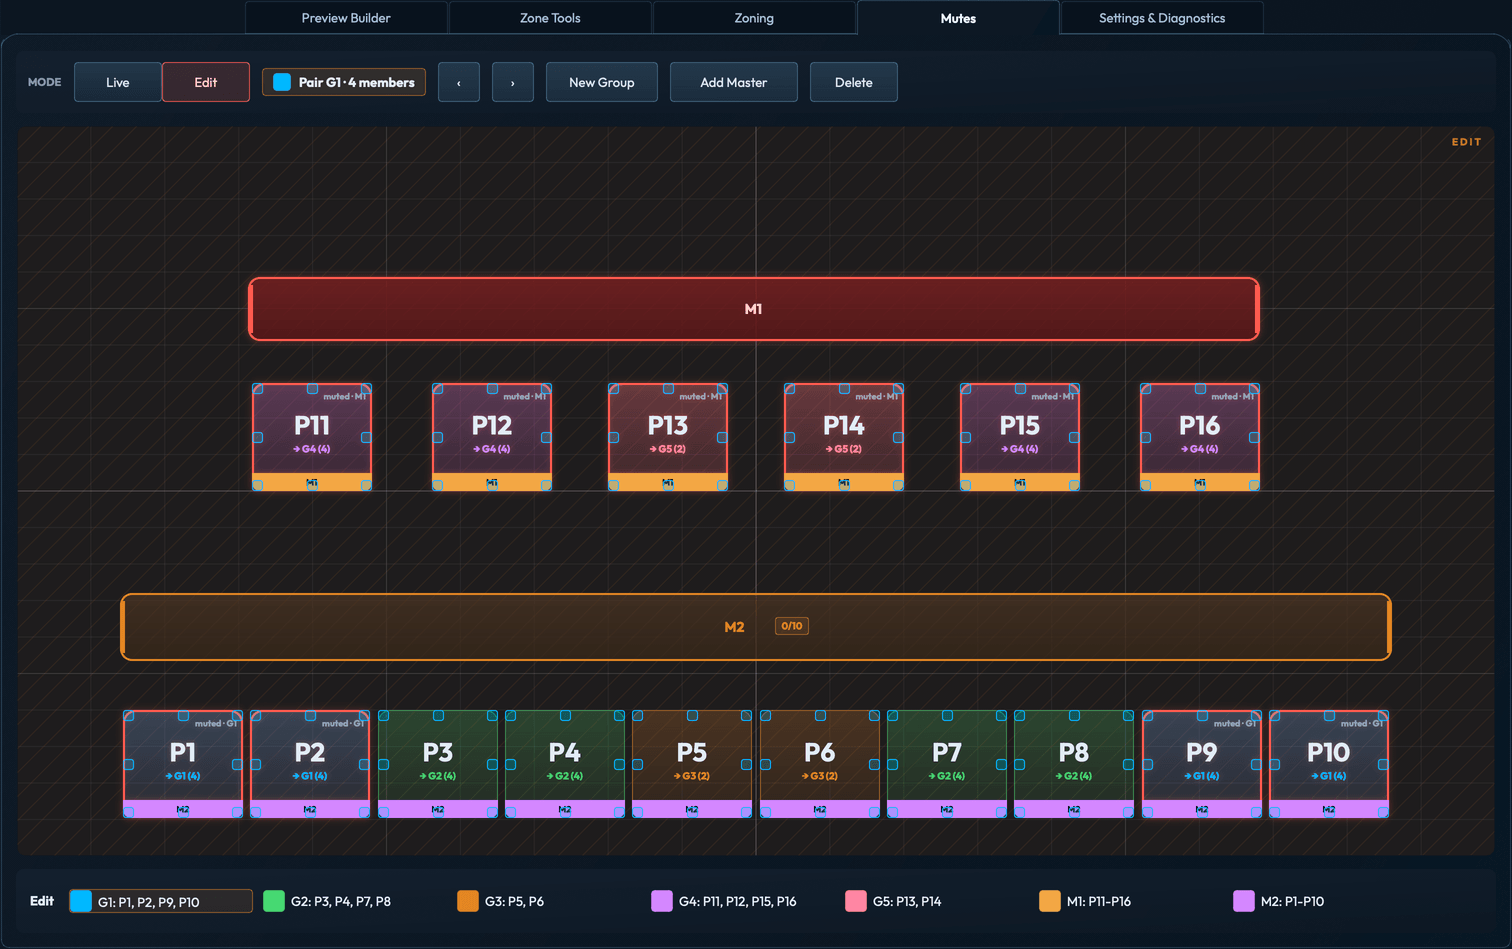
6.2 Edit mode
Edit mode is where you set up the Live tile layout. It's guarded: hold the Edit toggle for 1.5 seconds before changes are allowed. Edit mode holds:
- Pair groups: group two or more projector tiles together. Clicking one tile in a pair group mutes the others in that group.
- Master groups: scoped banners that mute all projectors assigned to that master. Use masters to silence large sections of the rig in one click.
- Projector placement: drag and resize tiles to match your physical rig layout. The arrangement carries over into Live mode.
- A zone-list match check so the Mutes workspace stays tied to the file it was built for. Loading it with a different zone list raises a warning.
§ 07Configuration
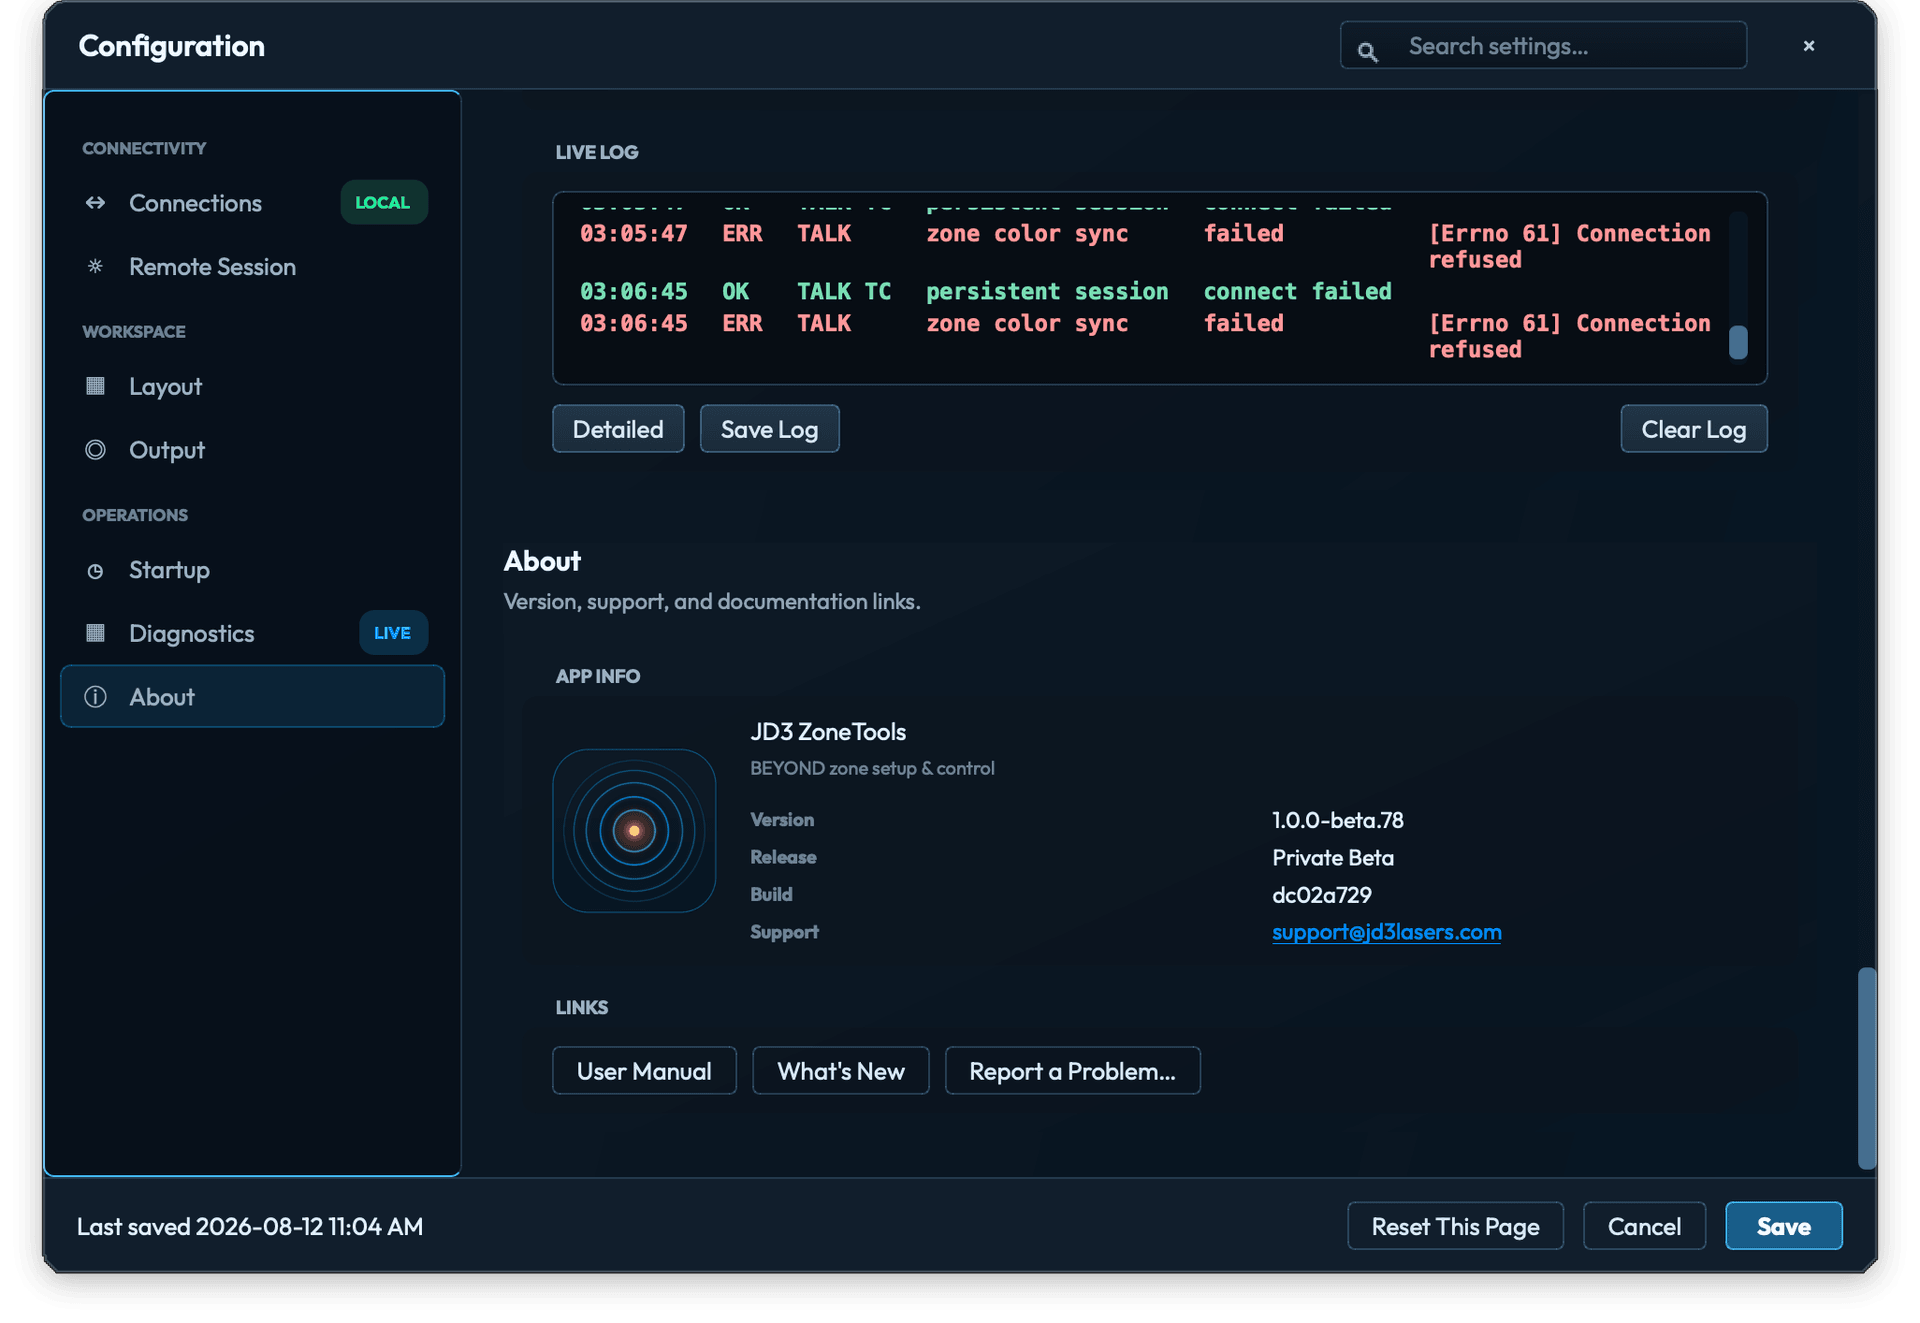
Open the Configuration… dialog from Settings → Configuration…. It is one scrollable document with seven pages in the left rail: Connections, Remote Session, Layout, Output, Startup, Diagnostics, and About. Search jumps to a matching setting. Save commits pending edits, Cancel discards them, and Reset This Page restores only the active page.
7.1 Connections
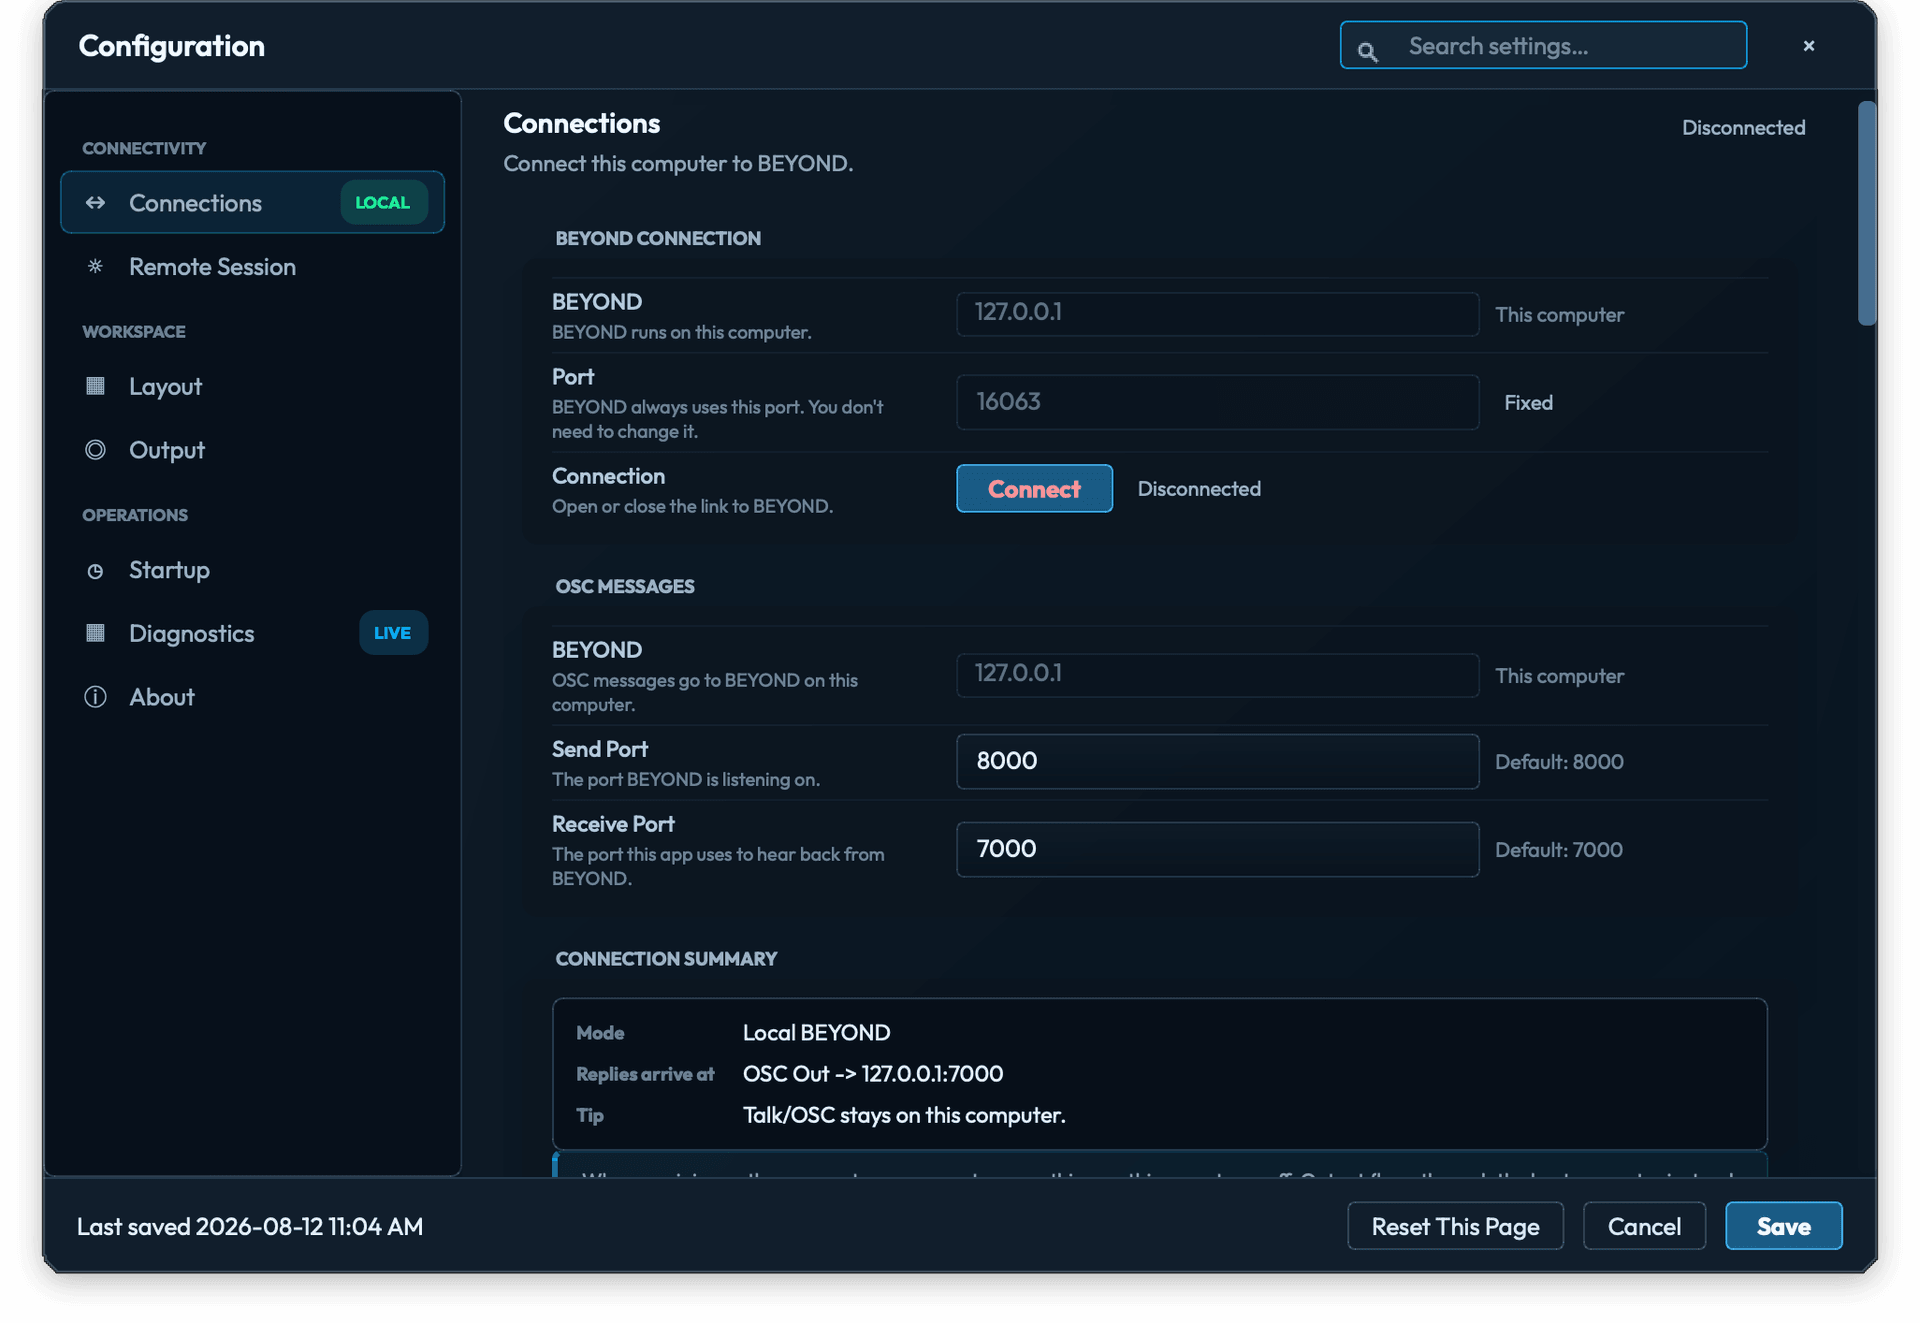
Raw Talk and OSC stay on the computer running BEYOND. Use Connect to open that local session; use Remote Session for control from another computer.
- BEYOND: fixed to this computer at
127.0.0.1. - Talk TCP Port: fixed at
16063. - OSC Send Port: app → BEYOND, default
8000. - OSC Receive Port: BEYOND → app, default
7000.
7.2 Remote Session
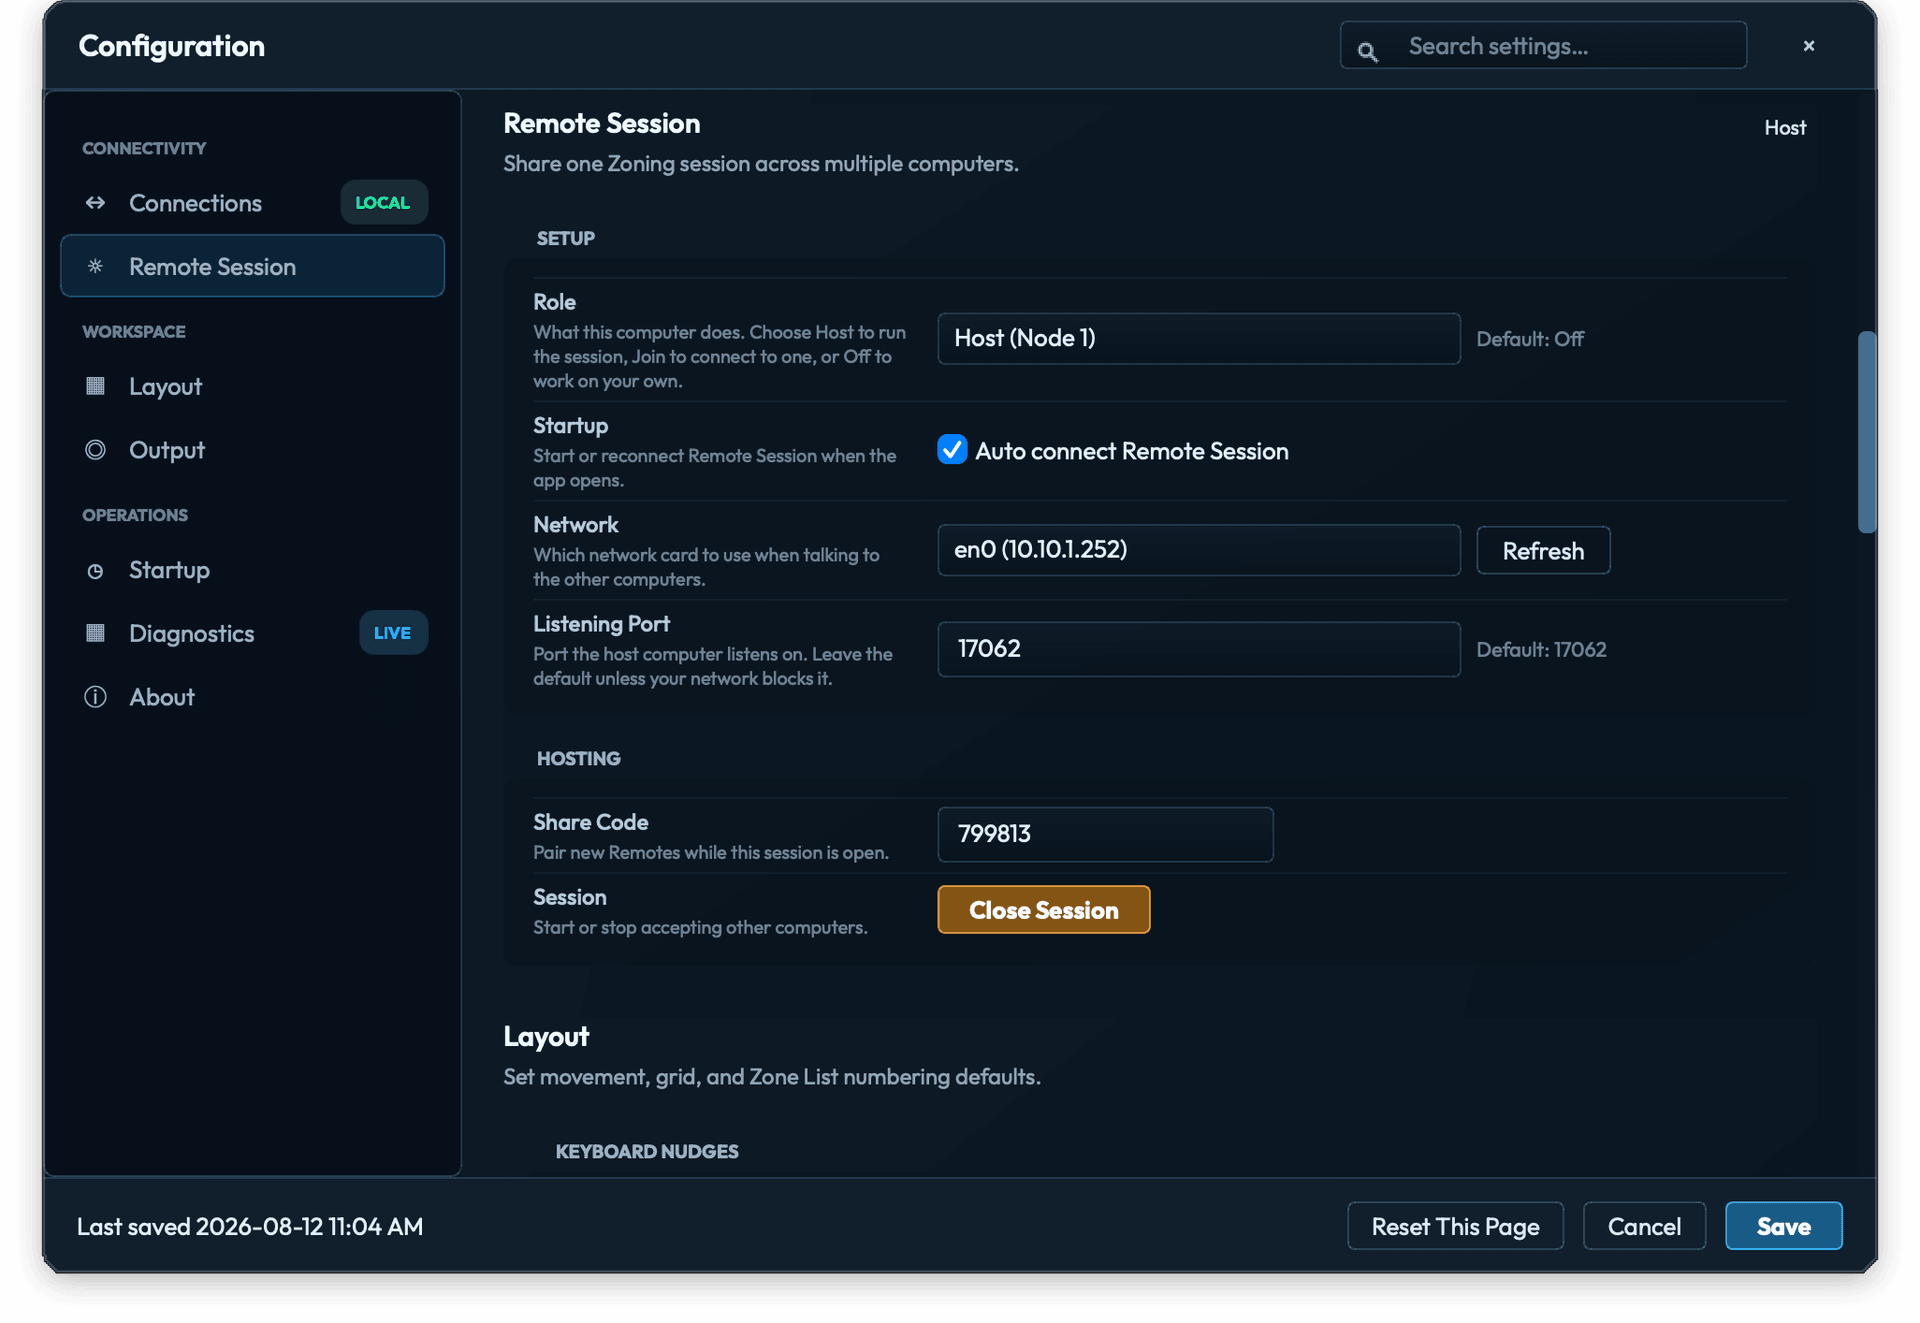
Remote Session lets more than one operator work on the same rig. Choose this computer's role, network adapter, and control port. Host (Node 1) opens the session and displays the six-digit Share Code. Additional BEYOND computers join as Helper (Node 2) through Helper (Node 10). Operator computers use Join (Remote). Two Remotes can work through Node 1 at the same time; a second BEYOND computer is not required. Node 1 keeps the shared zone file synchronized and prevents two operators from changing the same zone at once.
7.3 Layout
Layout settings control keyboard movement, grid spacing, projector/visualization numbering, and how multi-column sections are numbered when the list builder runs.
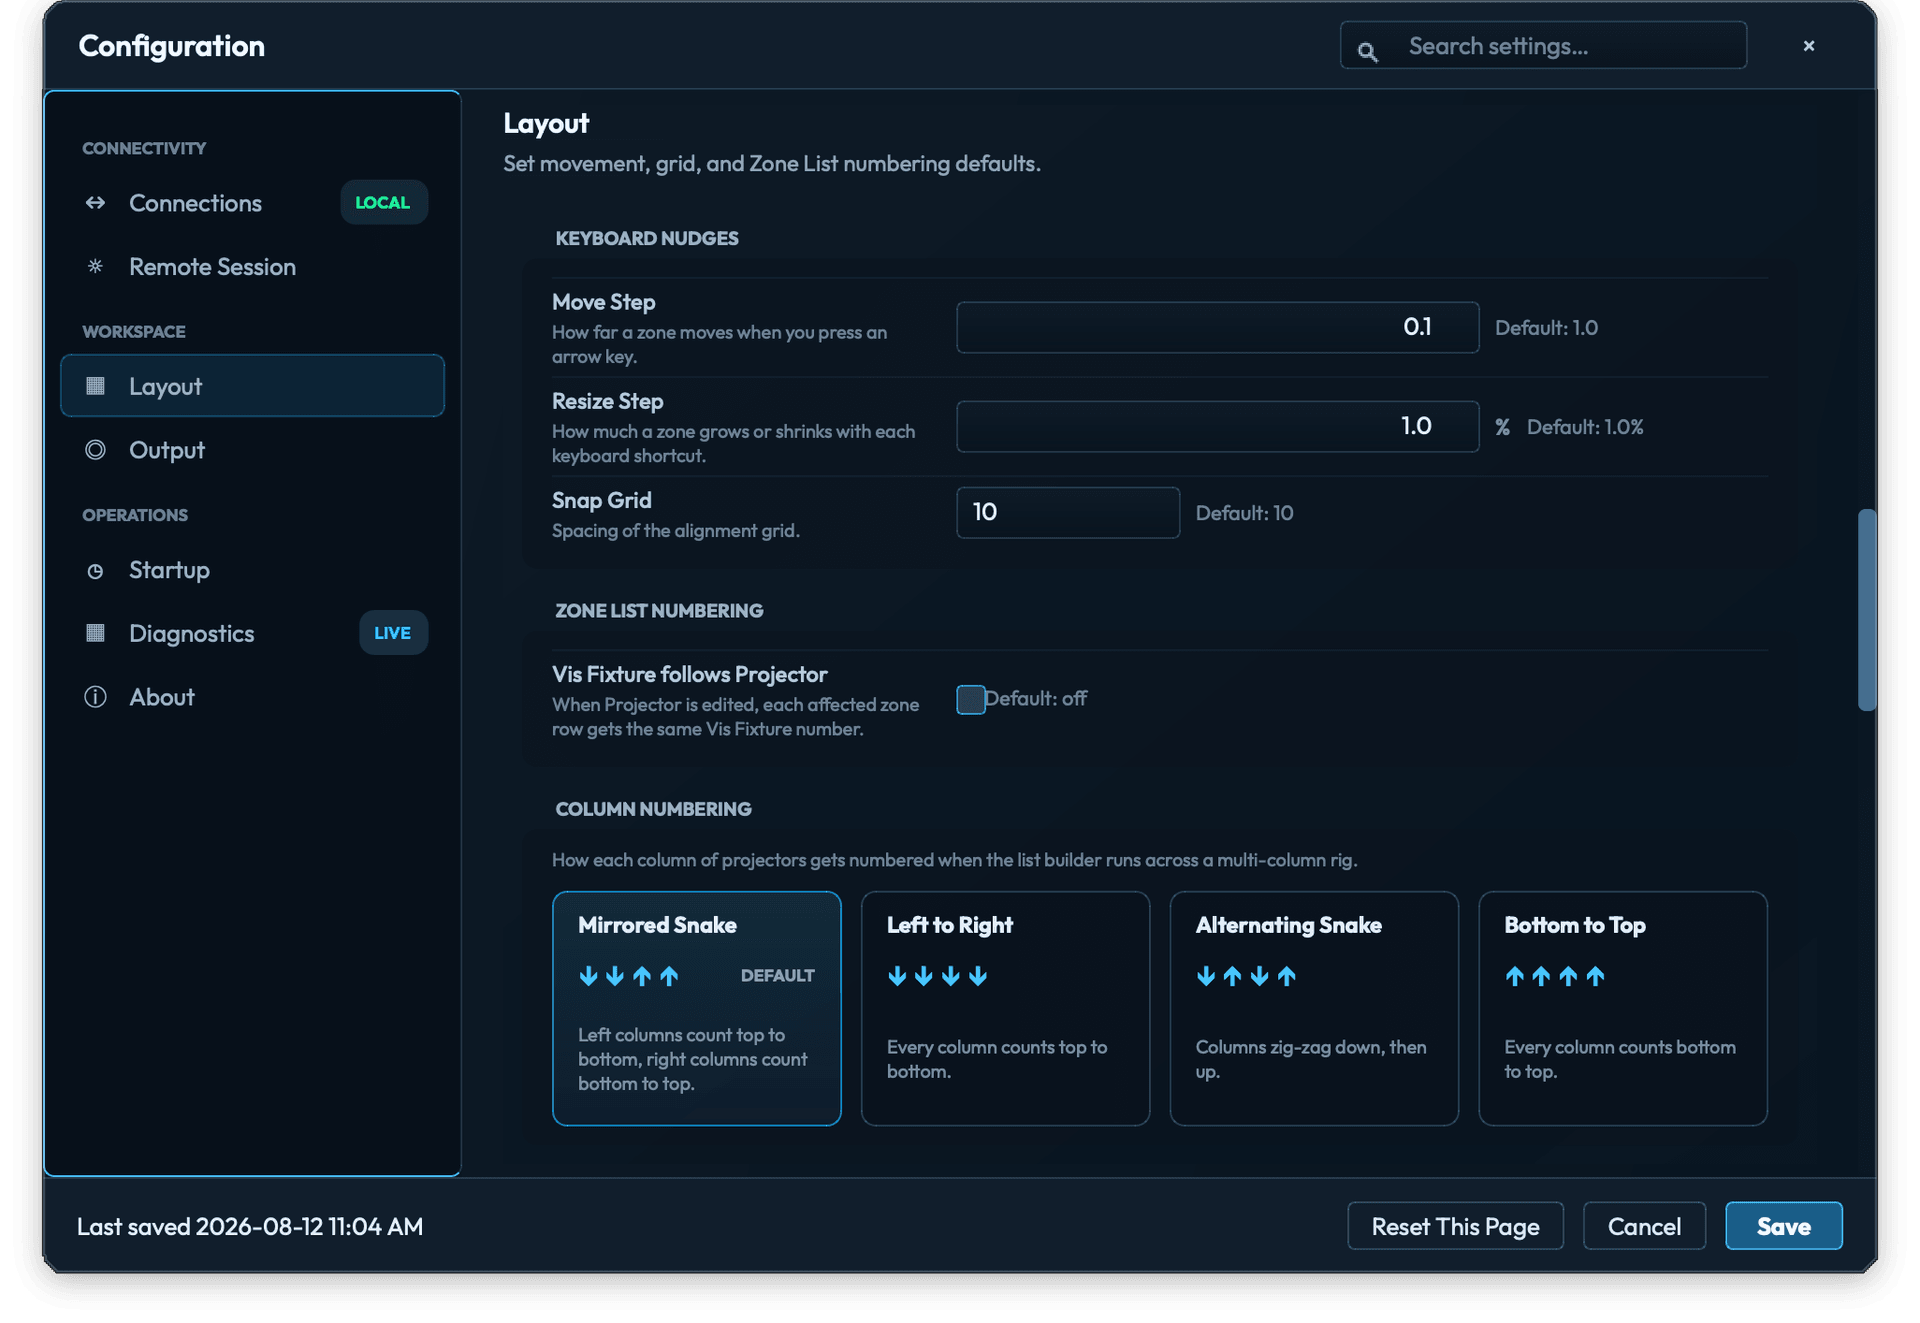
- Move Step: keyboard nudge increment for selected zones.
- Resize Step: width and height change for each mouse-wheel step while you hold
WorHover the canvas. - Snap Grid: canvas grid spacing.
- Vis Fixture follows Projector: when enabled, editing a projector number gives affected zone rows the same Vis Fixture number.
- Column Numbering: Mirrored Snake, Left to Right, Alternating Snake, or Bottom to Top.
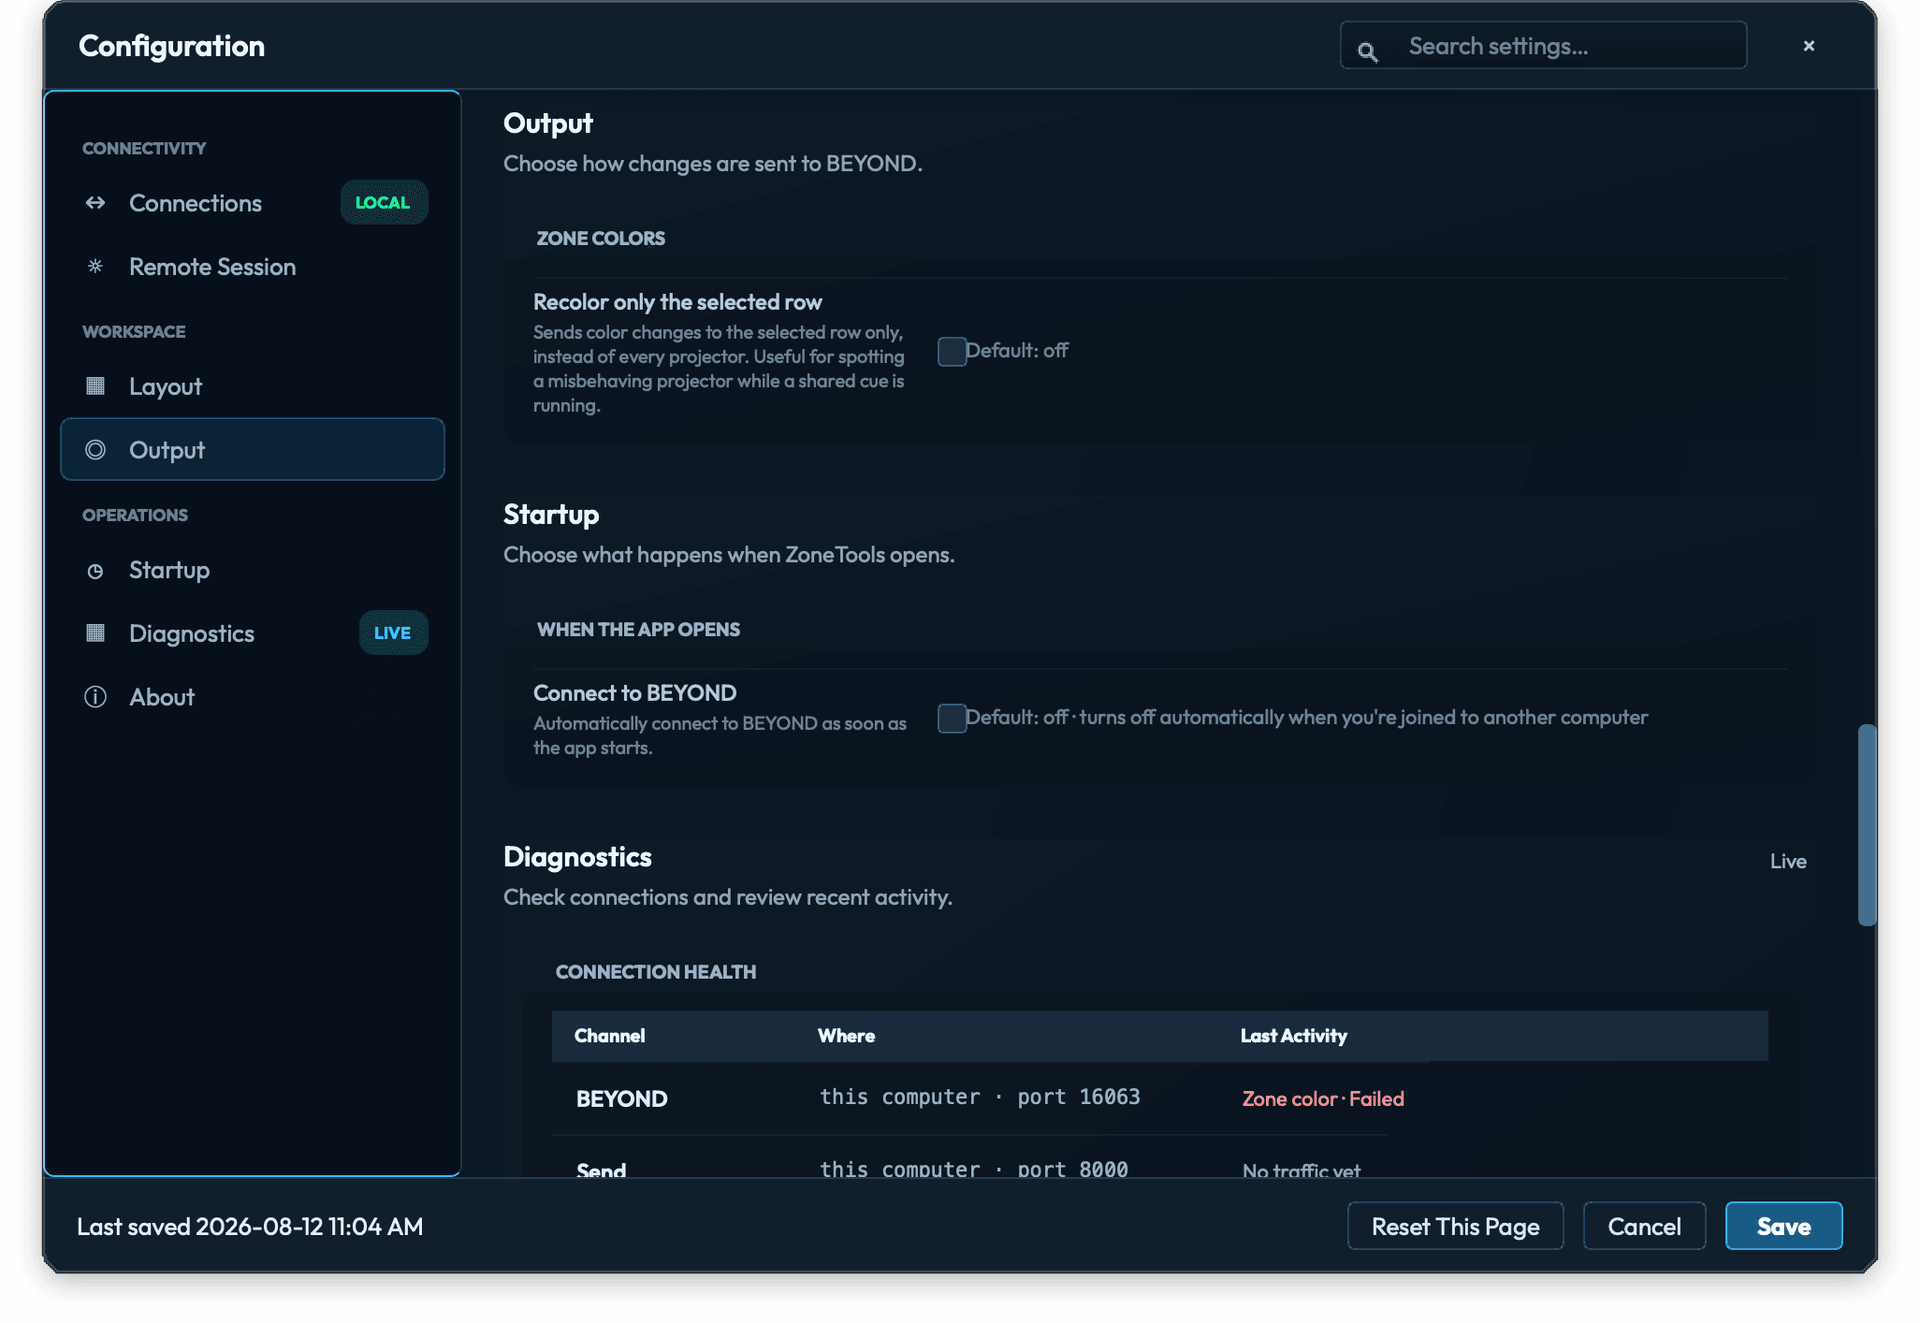
7.4 Output
Recolor only the selected row limits a zone-color change to the selected row instead of every projector. Leave it off for normal operation; enable it when you need to identify one misbehaving projector while a shared cue is running.
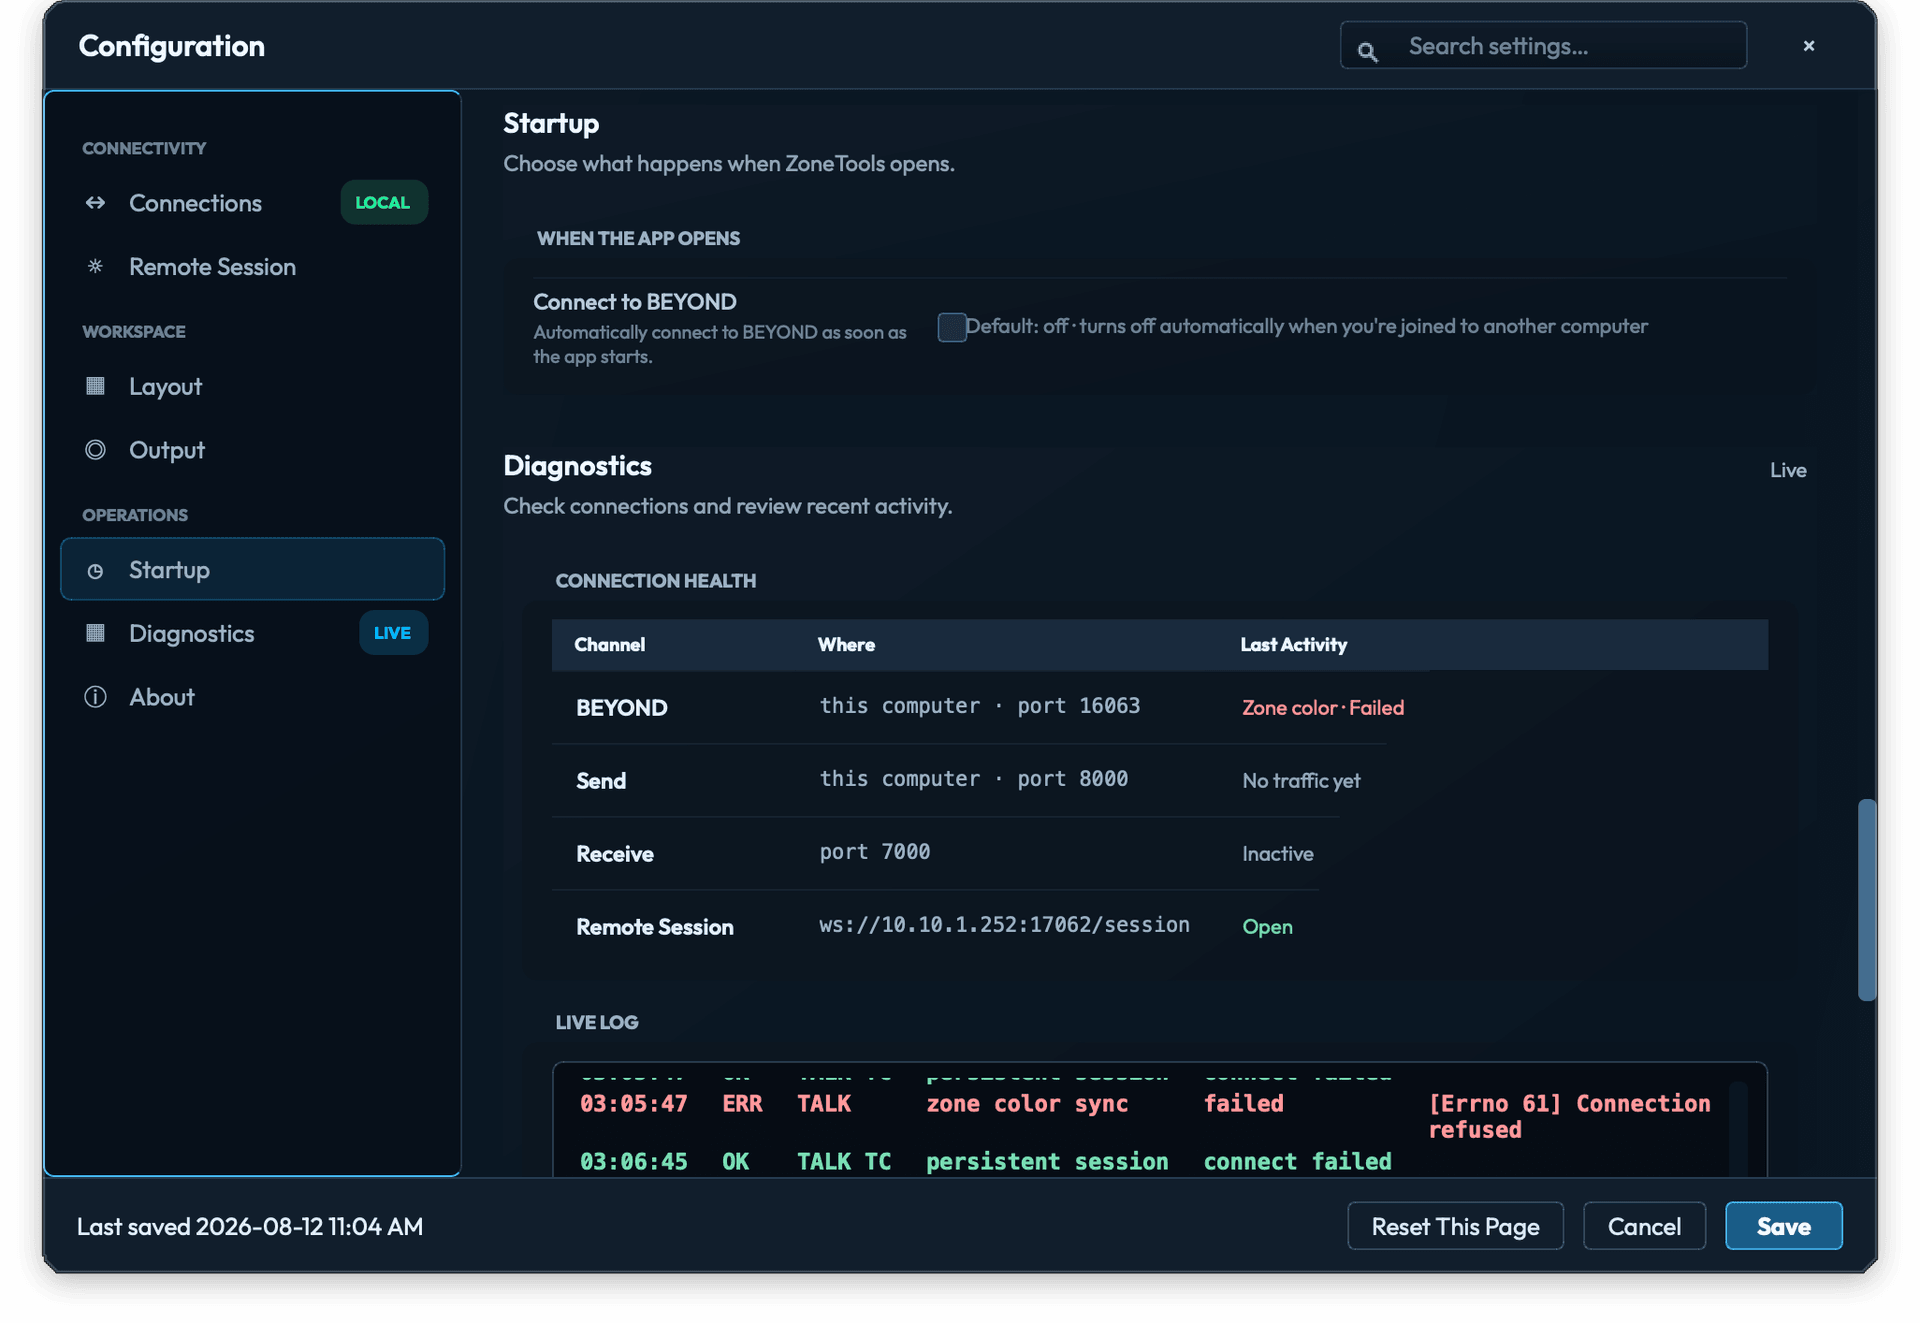
7.5 Startup
Connect to BEYOND automatically opens the local BEYOND session when ZoneTools starts. It is off by default and turns off automatically when this computer joins another computer as a Remote.
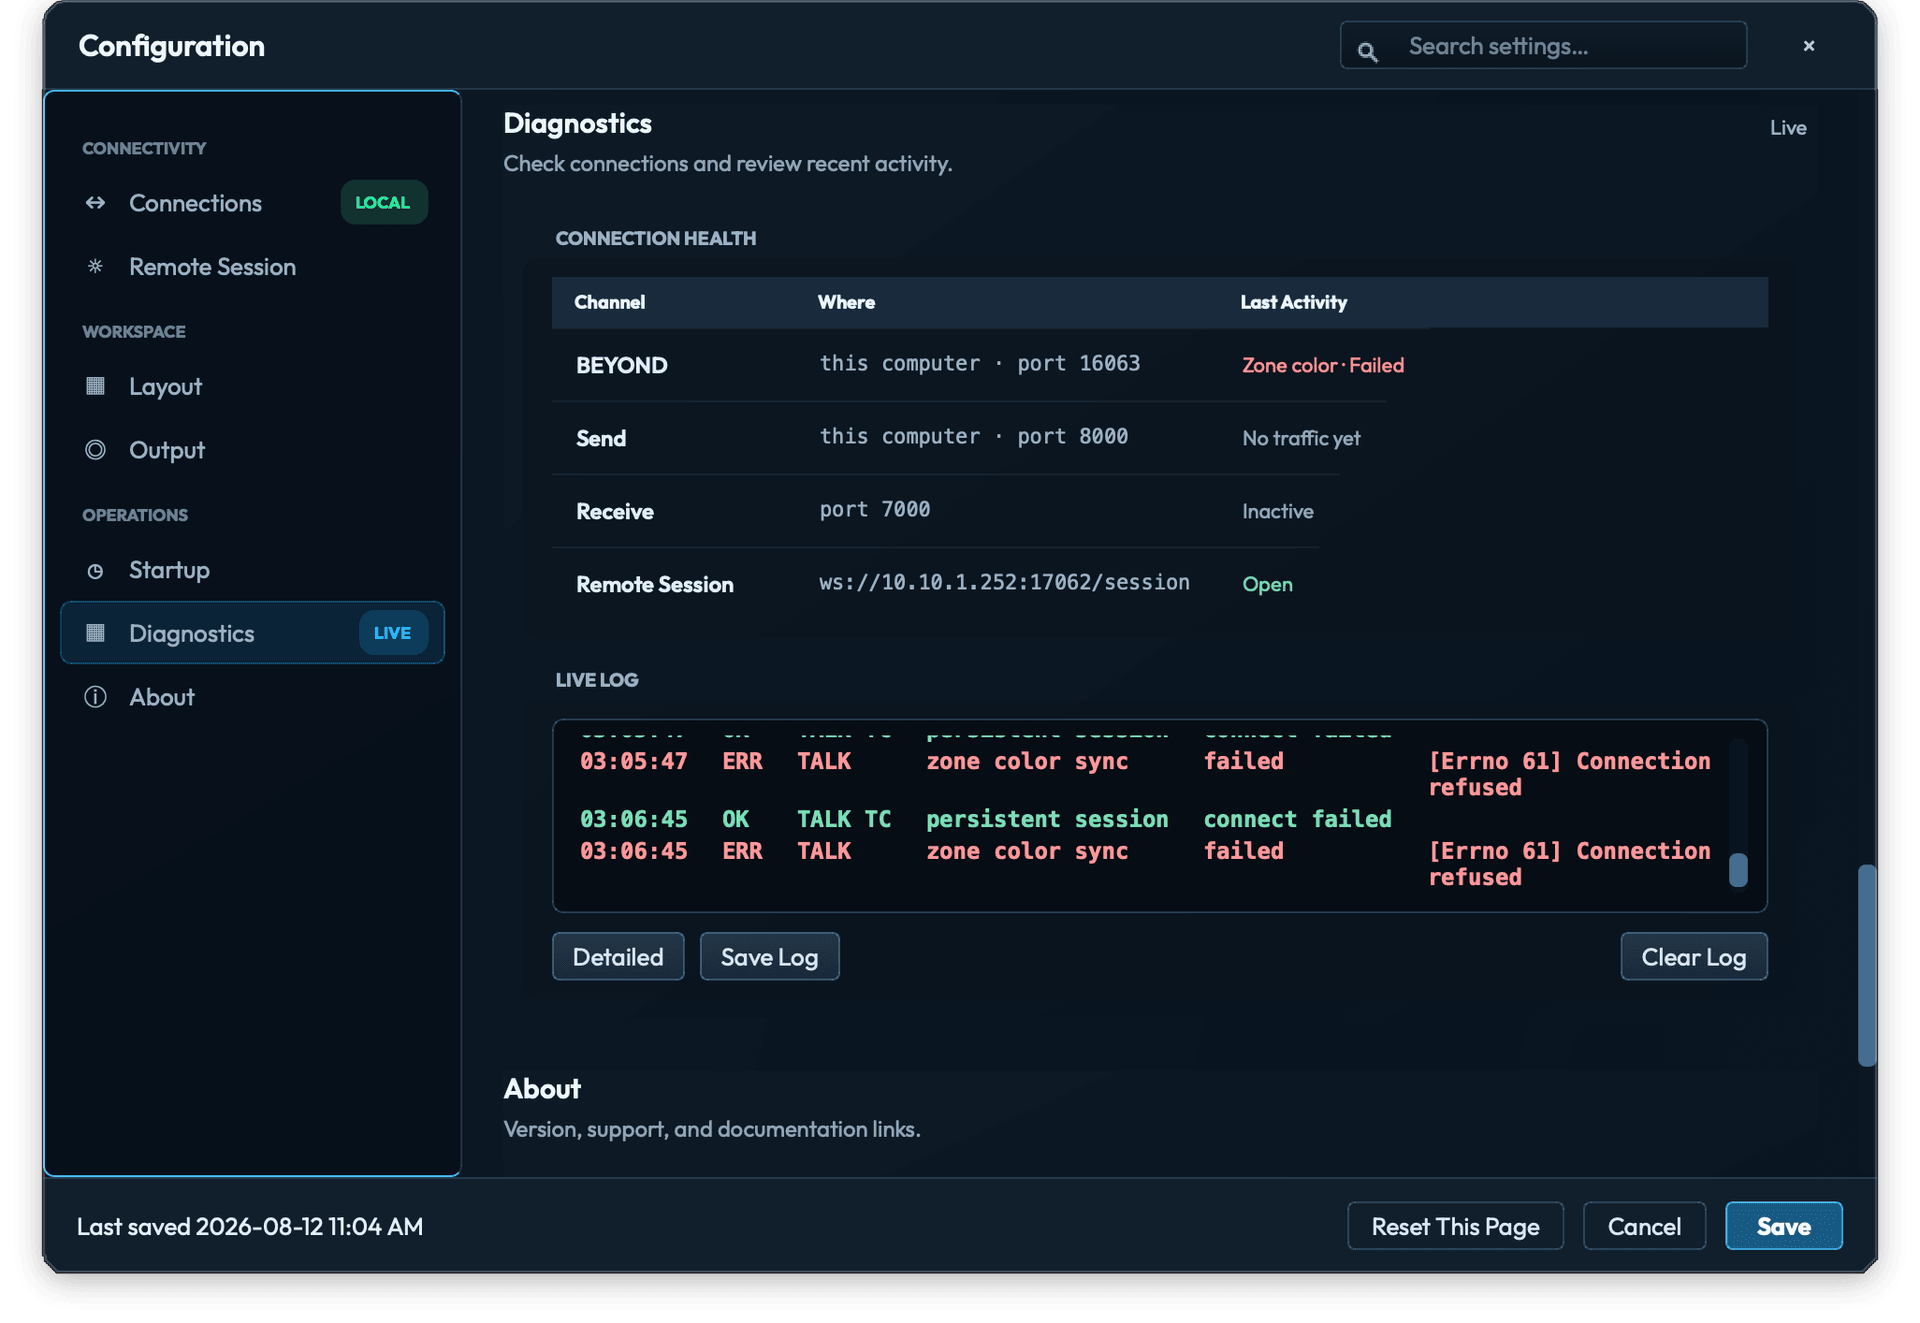
7.6 Diagnostics
Diagnostics gives you one place to check the local BEYOND session, OSC send and receive traffic, and Remote Session. Last Activity distinguishes healthy, inactive, and failed channels. The live log records recent operations and errors; switch between Detailed and Summary, save it with Save Log, or empty the current view with Clear Log.
7.7 About
About identifies the installed app version, release channel, and build. It also links directly to this manual, What's New, problem reporting, and support.
§ 08Reference: menus
File
| Item | What it does |
|---|---|
| Import CSV… | Load a BEYOND zone CSV export into the active profile. |
| Export CSV… | Write the active profile as a BEYOND-compatible zone CSV. |
| Load Stage Plot Overlay… | Pick a reference image (PDF / PNG / JPG / BMP) for canvas backdrop. |
| Edit Stage Plot Overlay… | Position, scale, and opacity controls for the loaded overlay. |
| Clear Stage Plot Overlay | Remove the loaded overlay. |
Edit
| Item | What it does |
|---|---|
| Undo | Undo the most recent edit on the zone list / canvas. |
| Redo | Redo the most recent undone edit. |
Settings
| Item | What it does |
|---|---|
| Configuration… | Open the Configuration dialog. See § 07. |
Tools
| Item | What it does |
|---|---|
| Export Group Membership Report… | Write a per-group membership report to a chosen path. |
Help
| Item | What it does |
|---|---|
| Open User Manual | Open this manual. Falls back to the GitHub-hosted copy if the bundled file is unreadable. |
| Open Changelog | Open CHANGELOG.md. Same GitHub fallback. |
| About JD3 ZoneTools… | Version, build commit (when available), and the brief app description. |
Zone list context menus
Right-clicking any row in the zone list (in both Layout and Toolbox) opens a context menu. Available items depend on the row type clicked and the current selection state.
Zone rows
| Item | Notes |
|---|---|
| Edit name | Inline rename. Disabled for the dummy-zone row. |
| Batch rename selected… | Rename multiple rows at once. Requires 2+ rows selected; not available on dummy rows. |
| Change type → Zone / Label / Group | Convert the row in place. Target type must differ from current; dummy rows are exempt. |
| Create Group | Wrap the selection into a new Group row. Requires at least one zone row selected. |
| Insert → Section Label Above / Below | Insert a new label row adjacent to this row. Disabled for dummy rows. |
| Insert → Zone Row Below / Group Row Below | Insert a new row directly below. |
| Add → Zone Row / Group Row / Section Label | Append a new row at the end of the list. |
| Duplicate row | Insert a copy of this row below it. Disabled for dummy rows. |
| Delete row | Remove this row. Disabled for dummy rows. |
| Fold → Fold all groups / Fold all labels | Collapse expanded groups or sections. Each option only appears when at least one group or section is currently expanded. |
Label rows (section labels and helper-bucket labels)
| Item | Notes |
|---|---|
| All Zone row items | See above, same set applies. |
| Section color → Assign section color… / Clear section color | Override the color key for this section. Clear only shown when an override exists. |
| Rebuild Groups | Open Group Generator scoped to this helper bucket (e.g. ---PAIRS---). Only shown on helper-bucket label rows. |
| Delete section | Remove the entire labeled section. Only shown in the Layout zone list. |
Group rows
| Item | Notes |
|---|---|
| All Zone row items | See above, same set applies. |
| Group members → Replace with selection | Overwrite this group's Also to list with the currently selected zone rows. |
| Group members → Add selection as group members | Append selected zone rows to the existing member list. |
| Group members → Remove selection from group members | Remove selected zone rows from the member list. |
| Group members → Add member… | Manually enter a zone name to add to the member list. |
| Group members → Sort members | Sort the Also to list alphabetically. |
| Group members → Clear members | Empty the Also to list. |
| Section color → Assign / Clear | Color override for this group row. Clear only shown when an override exists. |
Member rows
| Item | Notes |
|---|---|
| Edit member… | Edit the zone-name reference for this member entry. |
| Add → Zone Row / Group Row / Section Label | Append a new row at the end of the list. |
Empty area (no row clicked)
| Item | Notes |
|---|---|
| Add Zone Row | Append a new zone row. |
| Add Group Row | Append a new group row. |
| Add Section Label | Append a new label row. |
| Fold → Fold all groups / Fold all labels | Only shown when at least one group or section is expanded. |
Layout canvas context menu
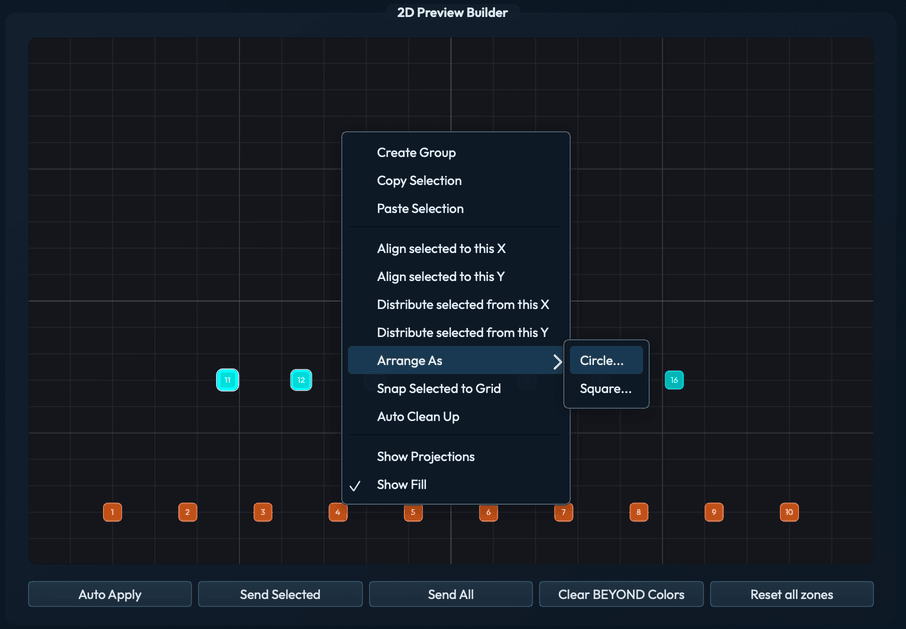
Right-clicking on the 2D Layout canvas opens a context menu. Items that require a selection are disabled when nothing is selected. A few items only appear when the click lands on a zone tile rather than empty space.
| Item | Notes |
|---|---|
| Create Group | Wrap the current selection into a new Group row. Requires at least one zone selected. |
| Copy Selection | Copy selected zone rows to the clipboard. Requires a selection. |
| Paste Selection | Paste clipboard rows into the zone list. Only enabled when the clipboard holds zone rows. |
| Align selected to this X | Align all selected zones to the X position of the clicked zone. Only shown when clicking on a zone; requires 2+ selected. |
| Align selected to this Y | Align all selected zones to the Y position of the clicked zone. Only shown when clicking on a zone; requires 2+ selected. |
| Distribute selected from this X | Distribute selected zones evenly starting from the clicked zone's X. Only shown when clicking on a zone; requires 2+ selected. |
| Distribute selected from this Y | Distribute selected zones evenly starting from the clicked zone's Y. Only shown when clicking on a zone; requires 2+ selected. |
| Arrange As → Circle… | Arrange selected zones in a circle. Requires 2+ selected. |
| Arrange As → Square… | Arrange selected zones in a square grid. Requires 2+ selected. |
| Snap Selected to Grid / Snap This Projector to Grid | Snap to the current grid step. Label changes to Snap This Projector when a single zone is clicked. |
| Auto Clean Up | Apply automatic spacing and alignment cleanup to the selection. Requires 1+ selected. |
| Show Projections | Toggle the projection-line overlay on the canvas. Checkable; persists across sessions. |
| Show Fill | Toggle the filled-region overlay. Only enabled when Show Projections is active. |
§ 09Reference: keybindings
Global
| Combo | Action |
|---|---|
Cmd+Z / Ctrl+Z | Undo the most recent zone-list or canvas edit. |
Cmd+Shift+Z / Ctrl+Shift+Z / Ctrl+Y | Redo. |
Layout canvas
| Combo | Action |
|---|---|
Cmd+A / Ctrl+A | Select all zones. |
Cmd+C / Ctrl+C | Copy selected zone rows to the clipboard. |
Cmd+V / Ctrl+V | Paste clipboard rows into the zone list. |
Delete | Delete selected zone rows. |
Escape | Clear canvas selection. |
← → ↑ ↓ | Nudge selected zones by Move Step. |
Width and height resizing uses the W−/W+/H−/H+ panel buttons. On the canvas, hold W or H and use the mouse wheel. Both use Resize Step.
Zone list (Toolbox)
| Combo | Action |
|---|---|
Delete | Delete selected rows. |
Ctrl+Shift+↑ | Move selected rows up one position. |
Ctrl+Shift+↓ | Move selected rows down one position. |
Mutes workspace
| Combo | Action |
|---|---|
Return / Enter | Commit a master-rail name edit. |
Escape | Cancel a master-rail name edit, or clear projector / master-group selection. |
§ 10Reference: settings
Settings persist per-user across sessions. Connection settings are the most commonly changed.
| Setting | Default | Purpose |
|---|---|---|
| BEYOND Host | 127.0.0.1 | Fixed loopback host for the BEYOND instance on this computer. |
| Talk TCP Port | 16063 | BEYOND Talk TCP port (fixed, not configurable). |
| Remote Session role | Off | Host the session, join as another BEYOND node, join as a Remote, or stay off. |
| OSC Send Port | 8000 | App → BEYOND OSC port. |
| OSC Receive Port | 7000 | Port where ZoneTools receives OSC replies from BEYOND. |
| Remote Session port | 17062 | Control port used by Node 1 for the shared session. |
| Auto connect Remote Session | Off | Reopen or reconnect the saved Remote Session when the app starts. |
| Move Step | 1.0 | Keyboard nudge increment for selected zones. |
| Resize Step | 1.0% | Width or height change per button or keyed-wheel step. |
| Snap Grid | 10 | Canvas grid spacing. |
| Vis Fixture follows Projector | Off | Copy edited projector numbers to the affected Vis Fixture fields. |
| Column Numbering | Mirrored Snake | Default column ordering for layout / Group Generator. |
| Recolor only the selected row | Off | Limit zone-color changes to the selected row. |
| Connect to BEYOND on startup | Off | Open the local BEYOND session at launch. |
| Live Log detail | Detailed | Choose detailed or summary diagnostics rows. |
§ 11Safety, scope, and data
JD3 ZoneTools plays it safe in three ways:
- Preview vs output separation. Layout and Toolbox edit preview geometry. They do not alter live laser-output safety geometry. Output-affecting work lives in Zoning (UGC correction, test frames, laser-output controls) and Mutes (live mute/unmute), each with explicit mode guards.
- Network behavior. ZoneTools connects or sends when you use Import from BEYOND, a preview Send action, Mutes Live, a Zoning output control, or Remote Session. Direct BEYOND connections stay on this computer; cross-machine traffic begins only when you open or join a Remote Session.
- CSV import/export integrity. Imports and exports preserve intentional label rows, group rows, dummy zones, and dead-projector rows; they are not silently rewritten. A group whose members no longer resolve blocks the export rather than writing a broken file.
⚠Out of scope. JD3 ZoneTools is not a show-control tool, cue editor, timeline editor, or emergency-stop tool. Hardware safety, beam-path checks, audience separation, scan-fail behavior, and any other laser-safety work stay with the operator, done in BEYOND and against the venue's safety system.
JD3 ZoneTools is independent software and is not affiliated with, endorsed by, or sponsored by Pangolin Laser Systems, Inc.
§ 12Troubleshooting
Import from BEYOND finds zero zones / times out.
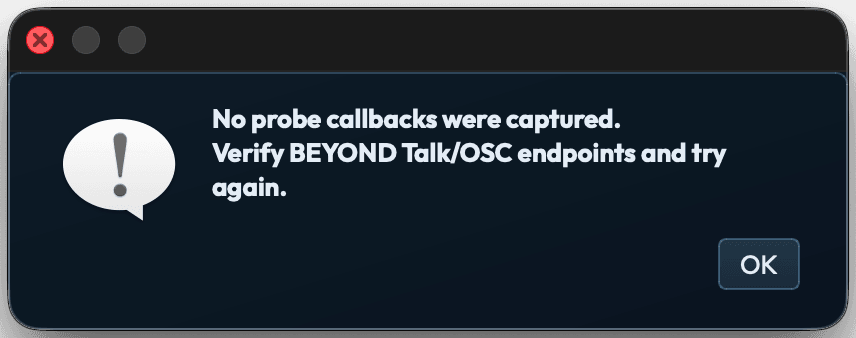
If the probe completes without receiving any callbacks, JD3 ZoneTools shows a No probe callbacks were captured dialog (Fig 12.1). Confirm Talk TCP and OSC connection in Settings → Configuration… → Connections, then check Diagnostics for a successful BEYOND session on local port 16063. If Connect fails, confirm BEYOND is running and Talk TCP is available on that port.
Send Selected / Send All shows partial-success in diagnostics.
That's accurate reporting, not a bug. The diagnostics log shows exactly which messages in the batch landed and which did not. Re-send the affected zones; if it keeps happening, check BEYOND-side load or the network path.
CSV export fails with “group references missing zone”.
A group row's Also to list names a zone that no longer exists, usually because the zone was renamed or deleted after the group was built. Open the affected group and either regenerate it through Group Generator or edit the member list directly.
CSV export warns about BEYOND build < 2044.
JD3 ZoneTools writes Also to rows that older builds will not natively re-import. Use BEYOND build 2044+ for import/export fidelity, or accept the loss of Also to columns when re-importing on the older build.
Group Generator says my pair groups have unexpected coverage.
This is the column-rig fallback described in 3.4. Use the focus action on the Pairs family header to inspect bucket boundaries, drag dividers to fix coverage, then Generate.
I dragged a divider but nothing changed.
The projectors either side of that divider almost certainly share an X coordinate; drags snap between X stacks and will not split one. Adjust the canvas geometry (or the column ordering) so the stacks separate, then drag again.
Mutes Edit mode says the zone list does not match.
The Mutes config was authored against a different zone-list profile. Either re-author the Mutes config under the current profile or load the original profile.
Zoning UGC correction grid disappears when I switch tabs.
Expected. Zoning clears all output state when you leave the tab. Re-enter Zoning to resume.
Apply Diagnostics shows “No traffic yet” indefinitely.
Nothing has been sent yet. Send one zone with Send Selected. If diagnostics still report no traffic, confirm the Connections ports and check that the firewall or another process is not blocking them on the BEYOND computer.
The bundled manual does not match the installed build.
The bundled manual ships with each release. Check Configuration → About for the installed Version and Build, then open the current web manual from About. Include both identifiers when reporting copy that does not match the app.